belaying

Assisted Braking Devices

Assisted Braking Devices have been a part of American climbing for a long time. By 1992, American climbers and belayers were alternately condemning and commending the new tools, and most of those perceptions persist today.  In many cases, the GriGri is unfairly given credit for securing belays in an unprecedented way.  In other cases, the GriGri is maligned as symbolic of complacency, poor belaying, and laziness.  Over the years, American belayers have over-heard epithets like:

“The GriGri promotes lazy belaying.”

“The GriGri has an automatic brake.  You can’t mess it up.”

“GriGris might be great for toproping or sport climbing, but it’s unsafe to use them for trad.”

“GriGris are the industry standard for belaying a toprope.”

These statements and the reductive thinking behind them have inhibited Assisted Braking Devices from taking their logical place in American climbing. This article will seek to unpack and explain some of the historical and cultural underpinnings of assisted braking devices like the GriGri in order to explore how these devices have gotten to the point that they are neither appreciated for their contributions to climbing nor adequately respected for their complexity and intricacy.  

To get there, we will need to clarify the current and historic role of backups in any technical system related to climbing. We will need to explain how these tactics long preceded the invention of the GriGri, because they are still just as important in the era of assisted braking devices as they were before GriGris hit the scene in the early ’90s.  Then, every climber will be better equipped to discover what Assisted Braking Devices offer to the overall security of a belay or rappelling system.

This article will qualify the use of Assistant Braking Devices according to the following principles:

  • Assisted Braking Devices, when used correctly, provide a reliable backup to any belayer.  

  • Assisted Braking Devices, when used correctly, offer the greatest movement economy when delivering slack to a lead climber.

  • Unlike Manual Braking Devices (like any tube style device), ABDs have widely variable performance characteristics from one model to the next.

Backups

In climbing, we use backups all the time.  We use them as an integral part of our systems and we often use words like redundancy and security when we’re talking about backups.  In every case, the basic concept is the same: a climber relies on one system to stay safe, and there is another system that acts as a back-up in case the primary system fails or malfunctions.  

Let’s look at some of the most common examples:

Climbing

climbing backups.jpg


Rappelling

Anchoring

Backups are a great idea, and they help us have a lot more confidence that we’re going to survive an error, a slip, an oversight, or a freak occurrence.  When we choose not to use a backup, we’re often flirting with unnecessary risks.

Let’s look at some examples:

Free Soloing

Lowering with an MBD without a backup

lowering sans backup.jpg

It is not common to think of backups in this way. However, when a climber analyzes the role of backups and looks at all climbing practices through that lens, it is difficult to escape the conclusion that holding a climber’s weight with a manual braking device and lowering a climber with that same device is tantamount to free-soloing. Unlike free-soloing, though, belaying usually involves two people; they are both complicit in this arrangement.

Before Assisted Braking Devices were an option, conservative belay teams relied on backups that are still options today. 

belaying; how to belay; how to back up a belay

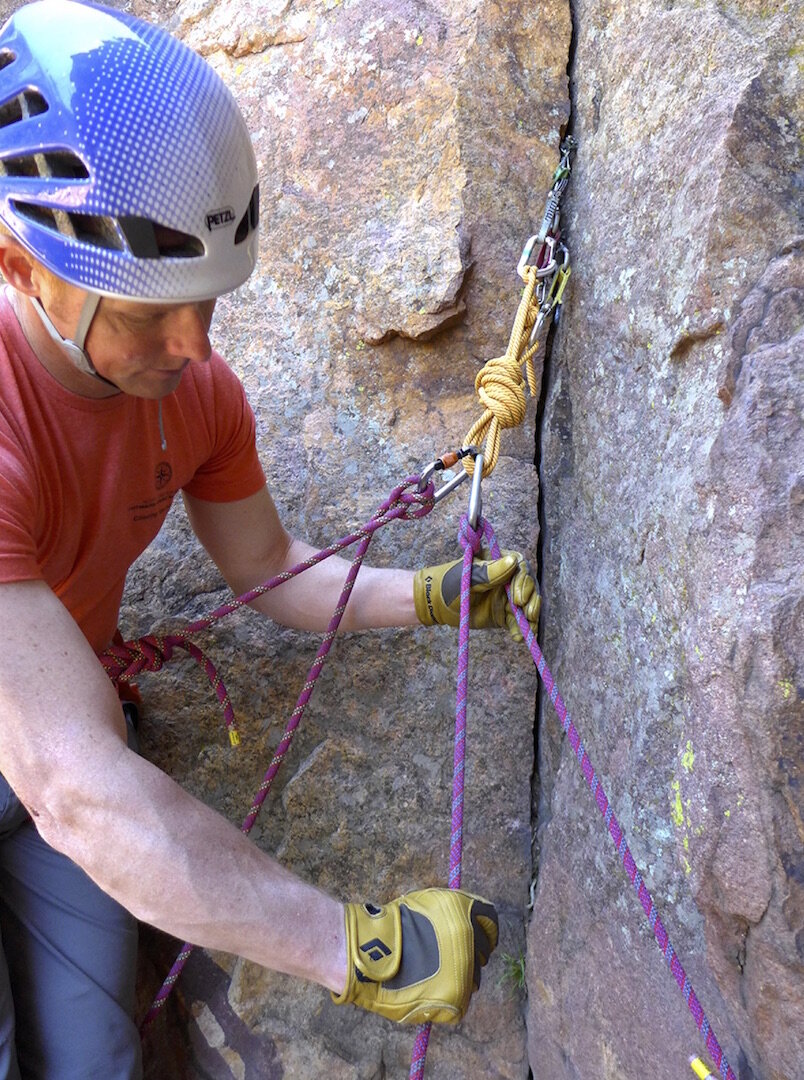
Since climbers are often standing around in groups of three or four, it's easy to offer a backup belay.

backing up a belay; how to belay

If a backup belayer is not standing behind the belay device, in the braking plane of the device, the value of the backup might be nominal.

backup knots; rock climbing knots

These backup knots, tied every 10 to 15 feet, provide a backup to the belayer when she does not have someone available to provide a backup belay.

belay back up; friction hitch

While a friction hitch can provide an adequate backup for lowering, it takes practice to tie this hitch while holding a climber,  and it won't work on every harness' leg loop design.

A careful observer of these traditional forms of backup will notice that an incompetent belayer (or pair of belayers) still has the capacity to injure a climber. So, an unstated but obvious addendum to the application of any backup to any system is that incompetence is presumed to be negated. It’s an important distinction to make. Gross incompetence can override all reasonable backup systems, and safeguarding against incompetence quickly becomes impracticable.  

Belaying systems presume functional cooperative competence as a starting point, and backups safeguard unforeseen forces and circumstances that can unexpectedly incapacitate a belayer. So, it’s important to combine fundamental belay principles to any belay device, regardless of the braking apparatus. All devices require a belayer to keep a brake hand on at all times, slide or alternate the brake hand only when the rope is in the braking plane of the device, and use the hand wrist and arms according to their natural strength.

Assisted Braking Device = Backups

An assisted braking device, operated within the fundamental principles of belaying, is an especially valuable tool if climbing teams prioritize backups. If a belayer takes an honest self-assessment of all the things that might thwart the best intentions of a diligent and competent belay, then it is difficult to justify not prioritizing backups. It is perfectly reasonable, and perfectly human, to accept that any number of sights, sounds, and distractions compete for a belayer’s attention. Other climbers, friends and acquaintances, passersby, flora and fauna, changes in weather, they all distract even the most committed belayers. In these perfectly predictable and likely circumstances, the assisted braking mechanism of an ABD can provide the ready-to-go attentiveness that the belayer momentarily lacks.

More persuasively, there are occurrences in the climbing environment that can easily incapacitate a belayer, regardless of their position relative to the climber (above or below). If a belayer is willing to indulge the imagination, these hazards quickly accumulate:

  • Rockfall generated by climbers above in a separate party

  • Rockfall generated by a climber in one’s own party

  • Natural rockfall

  • Icefall (for all the same reasons)

  • Avalanche (for all the same reasons)

  • Electricity of all kinds

  • Aggressive Fauna (stinging insects and arachnids, snakes, large predators)

  • Aggressive Flora (treefall, deadfall, prickling plants, poisonous plants)

  • A leader climber falling and impacting the belayer

  • Medical problems (allergies, asthma, diabetes, seizures, other chronic conditions)

Accident archives and anecdotal evidence demonstrate, again and again, that the selection of an ABD provides belayers and climbers with a backup should any of the aforementioned hazards incapacitate the belayer.

On one notable example, a pair of proficient climbers had a spectacularly close call in Eldorado Canyon in 2008. In much the same manner catalogued above, the leader climber dislodged a large rock during a lead fall.  That rock fell and hit the belayer.  The belayer, having selected an ABD, managed to arrest the leader’s fall despite the severe injuries he sustained.  Had the belayer selected a manual breaking device instead, like an ATC, without any sort of backup, the leader would have likely been severely injured as well. As it turned out, the leader was able to run for help and assist rescuers to evacuate his partner.

climbing accident report; rock fall accident

An ABD is not a panacea for mishap or incident, but it does provide all belay teams, like this team from Eldorado Canyon, with a margin of error. Surely, that’s an adequate incentive for any climbing team to learn more about ABDs, and it’s a sound reason to learn to use them correctly. 

Movement Economy while Lead Belaying

Many assisted braking devices offer the greatest economy of movement when delivering slack to the lead climber. Even though many belayers assert that ABDs have cumbersome mechanics resulting in a jammed rope and an inability to provide adequate slack, most of these assertions are based on a lack familiarity with the techniques needed to use an ABD to belay a lead climber.

The key to this movement economy involves a stationary brake hand. It might be helpful to see fundamental belaying with an MBD contrasted with an ABD to demonstrate this concept explicitly.

giving slack while belaying; belaying with an ATC
how to belay with an ATC
how to belay with an ATC; break hand

Many ABDs, by contrast, keep the brake hand stationary, eliminating an entire step in the belay cycle. As result, there can be a 50% increase in overall efficiency when the belayer delivers slack to the leader.

belaying with a grigri; how to belay

This movement economy is especially useful on easy or moderate terrain, when the leader is unlikely to fall. One of the greatest hazards to the leader in that terrain might be getting tripped or snagged by an inadequate supply of slack from the belayer.  An imperative to provide adequate slack is also common on low-angled terrain when the leader tends to move in long strides. That kind of movement necessitates adequate slack because the leader’s balance is often precarious and unstable. In any case, it may be valuable for a belayer to opt for a belay tool and technique that provides slack to the leader as efficiently as possible while also adhering to the fundamental principles of belaying.

Variations among ABDs

While the Petzl GriGri tends to represent the entire genre of ABDs due to its popularity and history, it is not the only ABD available. A careful analysis of the various functions, applications, and performance characteristics of each ABD should help belayers make an informed choice when they select a device. 

Applications

ABDs are typically deployed in the following contexts, although many of these applications are not necessarily recommended by the manufacturer. Manufacturers tend to create recommended use guidelines that pertain to the most common usage, and any application outside of that usage is implicitly discouraged. Nevertheless, many climbers rely on these kinds of applications, so it will be important to disclose the nature of each application, even though the manufacturers may not. These applications will be listed from most to least common. An ABD’s ability to perform these applications and functions help climbers decide when and how to use one tool or another.

1.     Belaying a counterweighted toprope. In a toproping scenario, ABDs are commonly deployed by institutional programs, climbing gyms, and professional climbing instructors. The values of an ABD as a backup are especially conspicuous to these users.

2.     Belaying a leader in a counterweight arrangement. The belayer’s body weight anchors a leader’s ascent in protection increments. Sometimes this arrangement is distorted by the use of a ground anchor or a connection that protects the belayer from an upward pull. An ABD can predictably increase the impact forces generated by lead falls. Impact forces are measurably increased on the belayer’s body, the climber’s body, and the protection/anchor. In most scenarios lead climbing scenarios, however, the differences in impact force would not have catastrophic consequences.  

3.     Rappelling. If a rope is somehow fixed or counterweighted, an ABD can be used as rappel tool on a single strand of rope.

single rope rappel; rappelling with a grigri; how to rappel

When a single strand of rope is fixed, blocked, or counterweighted, an ABD can be used for rappelling.

"Rappelling with GRIGRI takes training, and it is important to system check ensuring proper rigging and connection."-Petzl

4.     Rope Ascension. If a rope is somehow fixed or counterweighted, an ABD can be used as a progress capture in an ascension system.

ascension systems for climbing; rope ascension

Many climbing instructors, like this one, learn to use an ABD for rope ascension.  As an improvised progress capture, these tools can be effective.

5.     Direct Belay. ABDs are often used by belayers to top-belay a second climber directly off the anchor. When top-belaying, direct belays are particularly advantageous. ABDs create unique challenges when belaying a leader in direct belay configurations.

belaying from above with a grigri

Direct belay applications must allow an ABD a full and uninterrupted range of motion.  If the device is laying on a slab or crammed against a protruding feature, the assisted braking function can be compromised.

Performance Characteristics.  

ABD manufacturers will each try to convince consumers that their products represent the most secure, reliable, easy-to-use device on the market. The truth is that climbing has diverse contexts with diverse environments, climates, and risks. That diversity is further compounded by the number people who climb: big people, small people, big hands, small hands, right-handed people, and left-handed. Some people are missing digits or limbs, and that might make one product more advantageous than the next.

When combined with function and the need for multi-functionality, each device will also have an array of performance characteristics that depend on each individual user’s style, body type, and unique challenges. Asking the following questions of every ABD will guide a user to the right model.  

Stationary Brake Hand: Does the manufacturer recommend a belay technique that allows the brake hand to remain stationary? Many devices do allow for this movement economy, and it is one of the most persuasive reasons to select an ABD in the first place.

Mechanical Braking or Passive Braking:  Is the assisted braking function mechanical or passive?  Mechanical Assisted Braking Devices, like the GriGri 2 or Vergo, have moving cams, clamps or swivels that pin the brake strand of the rope.  They are typically bigger and heavier than their passive counterparts. Their performance can be challenged in wet, snowy, or icy conditions. They can provide smooth lowers, multi-functionality, and reliable braking, though.

Passive Assisted Braking Devices exaggerate the “grabbing” quality of any aperture or tube style belay device. The “grabbing” effect is so severe, it effectively brakes the rope, providing the belayer with a backup.

Ergonomics:  Does the recommended use of the tool force the belayer to sustain unnatural, painful, or uncomfortable body positions?  Test the ergonomics of a device in all the application contexts. For example, the body mechanics involved in using a GriGri 2 are quite natural and comfortable for rappelling and counterweight belaying. But, lowering with a GriGri in a direct belay configuration requires an awkward manipulation of the GriGri 2 handle.  

Reliability of Assisted Braking Function:  Does the Assisted Braking Function perform reliably in the widest range of conditions and circumstances?  What are the known malfunction conditions? No ABD is automatic and 100% reliable.  They all have quirky and unique failure mechanisms that range from interference in the braking function’s range of motion, interference caused by precipitation (frozen or otherwise), inappropriate carabiner selection, or rope entrapment. Manufacturers don’t always advertise these failure mechanisms. 

Multi-functionality:  Does the device perform more than one function in climbing?  Do all the functions of the tool fall under the device's recommended use?  Are some functions discouraged, or are they simple NOT encouraged?

Smooth lowering and rappelling:  When lowering and rappelling, is the belayer able to control the rate of descent and keep that rate constant, without sudden halts or acceleration?  The ability to adjust the rate and the consistency of the rate varies from one tool to the next, and it can be especially inconsistent when using ropes at the extreme ends of the recommended range, ropes that are wet, or with smaller statured people.

Ambidextrous Usage:  Is the device effectively unusable by a right or left-handed belayer?  Does it function equally well with either handedness?  Many devices do not offer a compelling left-handed technique. Left-handed belayers often learn to use their right hands to belay because there is not a recommended technique, or the recommended technique is not as effective as simply learning the right-handed technique.

Size and Weight:  How big and how heavy is the tool?  Are there lighter options that accomplish the same functions and have the same performance characteristics otherwise?  In climbing, the size and weight of equipment can often make a big difference to the overall enjoyment and success of the team. All other things being equal, why not have a lighter, more compact tool?

Rope twisting: Does the device alter the plane of the rope’s travel?  When ropes move continuously in the same plane of travel, the rope is less likely to twist.  When that plane alters, say from a horizontal to vertical plane, twisting the rope is the unavoidable consequence.

Easy to learn, easy to teach:  How long will it take me to learn to use the tool?  Devices that are not ergonomic, have intricate parts and setups, and operate differently than other tools can often be more difficult for a belayer to learn to use correctly.  It shouldn’t take months and months of practice to learn to use a piece of belay hardware.

types of belay devices

Climber Communication


In the United States, many incidents and inefficiencies are caused by miscommunication within a climbing team. Often, highly consequential information needs to be relayed between climbers and belayers, and miscommunicating that information has unfortunately resulted in grave consequences. At the American Alpine Club, we have been gathering these unfortunate stories for over a century, and many incidents could have been entirely avoided had the team communicated more clearly. However, any skill that involves the use of language tends to resist standardization; it’s a challenge that has frustrated American climbers in all disciplines.

One of the first climbers to try to address these challenges was Paul Petzoldt. In The Wilderness Handbook he writes, “Unindoctrinated by the standard European techniques and philosophies of [the world war-era], I developed some new skills and ideas. I invented the first voice-signal system (now universally used in America).” American climbers have largely adopted and gravitated to some version of Petzoldt’s verbal commands for the last 100 years, because his assertions are as true today as they ever have been. Petzoldt wrote:

The human voice is difficult to hear and understand on a mountain. The belayer might be out of his companion’s sight, words do not carry well around rock projections, wind and rain sometimes make conversations impossible, even at short distances. Because of such interferences, I have developed voice signals that are brief and intelligible even when faintly heard.

Petzoldt’s innovation was insightful, and it informs the concepts espoused in this article. But, the Petzoldt voice signals that sound so familiar to so many climbers, can easily be obfuscated by a busy crag, dialect or nuances in pronunciation, and by the use of names within the voice signals—names distort the syllabic distinction that Petzoldt originally devised.

Communication, as a concept, has to be grounded in something less complex than language or speech or any group of practices that is so easily undermined by the nuances of dozens of individual cultures. It’s important to remember that communication is not always about language. Climbers who do not have the ability to hear, to speak, or to see have always managed to communicate with others, and those individuals climb in the United States as well. There is a need to address climber communication in a way to focuses on the essential goal climbers are trying to achieve, and language is only one of many ways climbers communicate.

In this article, we will explore why communication is so vital to climbers. We will explore the principles that should govern communication in all contexts, and from those principles we will make recommendations that are mostly likely to work in most contexts.

Why is Communication so vital to climbers?

Communication often results in establishing or relinquishing safety systems, like a belay, and establishing or relinquishing a safety system inappropriately can be dangerous.

AND

Climbing environments make communication difficult. Climbers find themselves in cacophonous surroundings (windy and rainy conditions, busy crags and climbing gyms with lots of competing voices, loud environments like roadsides, roaring rivers and streams, chirping and singing wildlife). Climbers are often out of sight of one another, making traditional nonverbal communication difficult.

climbing commands; multi-pitch climbing communication

Climbing environments often make communication difficult.  The sound of the ocean, in this case, makes it important address the fundamental principles of effective climber communication before the climbing starts.

Fundamental Communication Principles

Fundamentally, all formal climbing communication serves to mitigate the inherent hazards of climbing. Many of the climbing commands typically employed concern management of the rope system, which in turn affects the belay and the security of the person being belayed. The simple command “On belay” may be the best example of a rope system command. An additional set of commands exists to address the hazard of falling objects, “Rope!” and “Rock!” being the most prominent examples.

Effective formal communication in a climbing system relies on commands that follow three foundational principles:

Communication Agreement. Communication between climbers and belayers should be anchored to a script that is agreed upon prior to the need for the communication.

Communication Precision. Communication should strive to minimize the amount of oral traffic needed to relay information between parties.

Communication Action. Communication should imply an impending action, and therefore should unambiguously initiate that action. Communication also may be used to affirm the completion of an action.

Communication Agreement

Climbing commands are only effective if all members of the climbing party agree on what commands will be used and the explicit actions they imply. For example, there are a number of commands associated with eliminating slack from a belay system, including, “Take,” “Tension,” “Up rope,” and “That’s me.” Each of these commands carries a nuanced meaning that must be known by the belayer in advance in order for her to respond appropriately when her climber issues such a command.

agree on your climbing commands from the start

Every climber can appreciate what it's like to call for tension in the rope system.  Paul Petzold originally specified "TENSION" as the preferred voice signal, because it has two syllables, just like all the other commands that involve tightening the belay.  Today, "TAKE" is a common command, but the single syllable can easily be confused with "SLACK," which is the opposite of what this climber wants right now.

Establishing different formal climbing commands prior to every climbing outing with a new partner can inconvenience the climbing experience in little ways, but it's almost always worth the a little inconvenience at the beginning of the day in order to avoid an accident. Once the communication agreement has been established, a climbing team can default to that agreement until the conditions or the context necessitates an adjustment.  

There are common tropes and patterns that speakers of American English will recognize, regardless of region or background. Still, slight variations persist from one group of climbers to the next, and climbers should engrain the ritual of affirming their communication strategy before the climbing outing begins. The most common theme in miscommunication-related incidents involve climbers who neglected to have a vital “agreement” conversation prior to their climb. A simple conversation would have alleviated the confusion.

Communication Precision

Another common theme in miscommunication is over-communication. The climbing team might attempt to rely on informal communication and conversation when precise and unambiguous commands are needed. The communication might be redundant and therefore unnecessary. In both cases, the climbing team fails to appreciate that precision (communicating a precise action, no more and no less) is a fundamental concept.

When conditions are challenging, informal communication should be entirely eliminated to prevent miscommunication of important formal commands. For example, if the leader has climbed around a corner and into the wind, she would be wise to only use formal climbing commands with her partner to prevent being taken off belay prematurely.

Similarly, redundant commands over-communicate and create ambiguity. Some novice lead climbers use the commands “Clipping” and “Clipped” to inform their belayer that they will be clipping the rope into a quickdraw. “Clipping” implies that the leader will need additional slack to clip the carabiner; the formal command “Slack” is already used to alert the belayer to introduce slack into the belay system. “Clipping” is therefore a redundant communication.

“Clipped” suffers from problems with both redundancy and ambiguity; two meanings may be implied. First, the leader may be asking the belayer to remove unnecessary slack from the belay system (in which case a number of commands may do the job). Second, the leader may also be asking the belayer to check the clip: is the leader back-clipped? Z- clipped? Often, this task is impractical or impossible for the belayer to accomplish. Finally, both, “Clipping,” and, “Clipped” are unnecessary assuming the belayer is attentive. No system of communication, even if it is fundamentally thoughtful, can compensate for inadequate belaying.

climbing commands are a critical part of how to belay safely

"CLIPPING" and "CLIPPED" are rarely vital communications if the belayer is attentive.  A climbing team that prioritizes precision will eliminate unnecessary communication in order to minimize ambiguity and miscommunication.

When communication become challenging, eliminating unnecessary command or conversation allows the climbing team to anticipate essential climbing commands based upon their previous communication agreement.

Communication Action

Communication should have a clear and unambiguous relationship with an impending action. For example, “Off belay,” is often used to initiate the deconstruction of a belay system. As any climber can appreciate, the action that corresponds to the communication is often highly consequential, and in many cases an affirmative response to the action helps signify the severity of the action that has occurred. Climbing teams will often use affirmative responses like “Belay off” to signify the completion of an important action. However, any command which does not include or affirm a call to action can easily be interpreted for something it is not intended to be, and such inactive communication should be avoided.

For example, some climbers use the command, “Safe,” or, “In direct,” to imply that they are secured to an anchor in some way. However, these commands are superfluous--there is no action for the partner to take in response to this command, nor is there a corresponding affirmation. Instead, the climber could simply say “Off belay” if intending to secure herself and belay from above as in a multipitch climb. Alternately, the climber could say nothing at all and simply request “Slack,” if cleaning an anchor on a single pitch climb, for example.

Fundamentals of Communication in Practice

The following examples explore the use of fundamental communication principles in real-world scenarios and demonstrate an application of those principles to scenarios that are familiar to many climbers.

Scenario 1: Casual cragging with lots of other parties.

Perhaps the most frequent scenario in modern climbing has the climber and belayer starting together at the base of a pitch. Whether leading or top roping, the commands used are the same. Drawing on the most common climbing commands in the United States, our climber, Maria, queries her belayer: “Jorge, are you on belay?”

As the formal climbing command is a call to action, Jorge physically checks the entire belay system, ensuring his belay device is loaded correctly, the carabiner is locked, his harness is fitted properly, the rope is running properly through an adequate anchor if appropriate, his climber’s harness is fitted properly, and his climber has tied into her harness correctly. When appropriate, Jorge also ensures both he and his climber are wearing helmets. Only after completing all of these checks and confirming them with his partner can Jorge say, “Maria, your belay is on.”

In their communication agreement, Jorge and Maria decided to use each other’s names in their verbal commands. This strategy is particularly important when communicating in a crowded location or noisy environment, such as a climbing gym or a busy sport climbing crag. In the multipitch setting, preceding the command with a name is equally important as it alerts the recipient that a command follows and ensures that adjacent parties do not misinterpret the other party’s communication for their own.

communication tactics change when at a crowded crag

With climbing teams all climbing side by side, the use of names in voice signals is an advisable part of any communication agreement.

Jorge and Maria will use each other’s names to precede all of their verbal commands today, because that is part of their communication agreement, it is a precise way to specify which commands are directed to whom, and the teams needs a way to differentiate between vital commands that initiate action and the informal banter that will surely characterize their time at the crag.

suggested climbing commands for a crowded crag

Scenario 2: Multipitch Climbing

Jorge and Maria are now on a multipitch climb. They begin a pitch sharing a stance at an anchor together, so communication is straightforward prior to the lead. However, once Maria tops out the pitch, there’s a need for terse, precise, and unambiguous action-oriented communication. Belays will be deconstructed and the climbing team will be transitioning from one safety system to the next.

In their communication agreement, Jorge had two main concerns. Jorge wanted to know when exactly to start removing his belay device. He had an experience in the past when he thought the leader said “Off Belay.” On that day, the leader was actually shouting to a rappelling party, “I’m out of the way.” Jorge took the leader off belay prematurely that day, and he never wants to make that mistake again. On a completely separate outing, Jorge was taking his GriGri off the rope when the leader started pulling up the rope. The unexpected tug of the rope yanked Jorge’s GriGri out of his hands and it fell all the way down the cliff. Jorge doesn’t want to deal with either of these miscommunication problems again.

Maria and Jorge agreed that names will be less important today on this isolated climb; no other climbers are around. They’ve also agreed that when the leader shouts “Off Belay,” the belayer will immediately shout “Belay Off.” The leader will have one last chance to object, if Jorge has misheard the verbal command. Jorge agrees to wait a short second before deconstructing the belay.

Also, the leader agrees not to start pulling up rope until she hears the belayer shout “Maria, Up Rope.” It’s important for every climbing team to appreciate that Maria and Jorge could’ve agreed on a completely separate sequence here, and a completely separate set of commands to communicate that sequence. The vital point here is the relationship between prior agreement and precision; Maria and Jorge are being conscientious about both fundamental principles.

When the rope is tensioned against Jorge or his attachment to the anchor, he’ll inform his partner by saying, “That’s me.” This signals to Maria that the tension she feels in the rope is due to Jorge’s weight and not some other potential predicament, such as the rope being wedged in a crack or ensnared around a horn of rock. Maria’s call to action with this command is to put Jorge on belay immediately. “On Belay”

Jorge can now prepare to climb, secure in the knowledge that he is belayed from above. When he is ready to climb, he can inform his belayer with a simple, “Climbing!” A reply of, “Climb on!” will see Jorge to the top of the pitch to rejoin his partner.

Note that in the above exchange, Jorge does not query Maria as to whether he is on belay. There is no need as Maria will put Jorge on belay in response to the command of, “That’s me.” Further, Jorge may not be able to see Maria as she concludes her lead. Consequently, he will likely not know for sure when Maria has established an anchor and is ready to belay. In the best case, voicing, “On belay?!” will not elicit a call to action from Maria other than to say “No, not yet,” unless Jorge happens to pick just the right moment to ask. Asking if he is on belay simply introduces unnecessary, informal communication. In the worst case, shouting, “On belay?!” may be misunderstood as “Off belay!” Maria is likely to find this rather alarming if she has yet to complete her lead.

Scenario 3: Communicating without Commands

It is possible for a climbing party to communicate unambiguously without the use of verbal commands, thereby eliminating the potential for poor verbal communication or miscommunication. Provided the party can agree up on a system in advance, this is readily achieved. Let’s revisit the example in scenario 2 to see this in action.

Maria reaches the top of the pitch and secures herself to the anchor. Because they suspected the possibility of poor communication, Jorge and Maria agreed in advance to use only the necessary formal verbal commands. As Maria is secured to the anchor, she shouts, “Off belay!”

Unfortunately, Jorge is unable to hear this command. However, he knows that there are only two reasons that he might need to feed rope to the leader. Either Maria is still leading, or she has arrived at the belay stance and is pulling up excess rope. Since Jorge is unsure which is the case, he simply continues belaying until he reaches his end of the rope. As he did not hear Maria issue the “off belay” command, he has no reason to affirm this command. Instead, he skips this and simply proceeds to the next command, “Maria, that’s me!” He then removes his belay device from the rope.

Maria has pulled the rope until it is tensioned and thinks she hears Jorge shout a command to her, but she’s not positive. Regardless, her next step is clear: put Jorge on belay. She does so promptly and shouts, “On Belay!”

Meanwhile, down below, Jorge is diligently waiting to climb. Prior to starting the climb, Maria and Jorge agreed to a 30- second waiting period. After shouting, “Maria, that’s me!” Jorge waits 30 seconds and then removes himself from the anchor to begin climbing. He does this knowing that Maria will promptly put him on belay after the rope is tensioned, a task that should take no more than 30 seconds. Jorge and Maria could have agreed to any amount of time they felt appropriate; again the prior agreement is the important thing.

After the agreed upon amount of time, Jorge bellows, “Climbing!” and makes a couple moves. He has one last chance to make sure that he is on some form of belay. He’s making sure the rope is travelling up, in the characteristic progression of a belay cycle. In this sequence, Jorge and Maria have accepted that it might also be possible that Maria is not actually belaying. It is possible that she is still leading, and the team is now accidentally simul-climbing. Even though it’s scary and hopefully avoidable, Jorge and Maria appreciate that Jorge will have to climb in that scenario, even if he’s not on belay. What choice does he have?

Meanwhile, back at the top of the pitch, Maria cannot hear Jorge, but she can feel the slack in the rope he generates by climbing. She pulls the rope through the belay system and after a few feet of movement is sure Jorge must be climbing. As a confirmation, she yells, “Climb on!”

Troubleshooting Communication Challenges

Select belay stances and pitch lengths that enable communication, when feasible.

Occasionally, verbal communication is challenging or impossible. This happens most often on multipitch routes and can result from many factors, including a pitch that traverses around a corner or crosses a ridgeline, high winds, or stretching or linking pitches. The best strategy for these situations is simply prevention. Whenever possible, select stances that enable good verbal communication, or even visual communication if possible. Research the route thoroughly to know when your partner might be out of touch. Consider belaying at an appropriate stance even if the guidebook does not indicate the stance as a typical belay point.

nonverbal climbing communication is often necessary for multi-pitch transitions

This climbing team could have chosen to belay an any number of places.  The huge river gorge, the imposing rough, and the presence of other climbing parties nearby compelled the party to shorten the pitch-length and optimize communication.

The conventional wisdom is that stretching the rope and linking pitches results in a faster ascent as there are fewer belay transitions to be made. However, 15 minutes wasted shouting to a partner 200 or more feet distant certainly bears a greater time cost than two or even three efficient belay transitions.

Visual communication is helpful when verbal commands are inaudible.

Unfortunately, sometimes poor verbal communication simply cannot be prevented. This leaves a few options for alternative communication systems. A visual command system is one such solution. Such a system needs to be established in advance, but can be effective provided that appropriate belay stances are selected. Most often, a negative and affirmative command are all that is needed. For example, when the leader reaches the top of the pitch, she secures herself, then leans out to look down at her belayer and makes a slashing motion across her throat, indicating, “Off belay.” When the belayer has removed the belay device from the rope, he returns the signal. When the leader has put the follower on belay, she leans out and gives a thumbs-up signal straight overhead, indicating, “On belay.”

Beware of Rope Tugs.

A more common approach is a system of rope tugs used by the leader to communicate with the follower when she is off belay. Unfortunately, any system relying on rope tugs introduces significant ambiguity and the potential for miscommunication. For example, the climbing party may agree that three rope tugs from the leader means, “Off belay.” However, the leader might also issue three similar feeling rope tugs as a result of a potentially stuck rope or simple rope drag. If the belayer interprets this as a call to action, though, the leader may find herself unintentionally off belay for the remainder of the pitch.

Many climbing parties enjoy success with the rope tug technique, and their success usually hinges on a smoothly executed rope line, and a discipline avoidance of any rope movement that could be interrupted as a tug.

A second rope can be a communication tool too.

When climbing with two ropes, whether half ropes, a lead line and tag line, or as a party of three, the leader can unambiguously communicate the “off belay” command. Upon securing herself to the anchor, the leader’s next step is to pull up the ropes. By pulling up the trailing line first (or only one of the half ropes), the leader can clearly indicate that she is stopped at the belay stance as the lead rope is not moving.  

Just like the rope tugs, there can be opportunities for ambiguity here.  It helps for the climbing teams to consciously avoid these signals.  If the isolated movement of one of two ropes is agreed to be an "Off Belay" signal, a leader should not move that rope independently unless she is off belay.

Radios, Cell Phones, and Technology

FRS radios are another option and can ease communication considerably over long distances or in poor conditions. However, radios have a number of drawbacks, including weight and costs. Further, radio communication quality varies, both in transmission clarity and range. Additionally, radios rely on battery power, yielding an additional battery to manage. Should batteries die, over- reliance on radios may also leave a party ill-prepared to use an alternative form of communication. Despite these costs, radios can be effective and beneficial in appropriate contexts, such as multi-party climbing, expeditionary climbing, and complex ski descents. Similarly cell phones and text messages have a comparable potential and drawbacks. These technologies all present the same conclusion to a climbing team: do not rely too heavily on technology. Climbers have been communicating quite effectively without these technologies, and those traditional communications skills have value. 

Pre-Climb Communication

Special Thanks to Contributors

Derek Debruin is from Weber State University in Ogden Utah.  Derek is an AMGA certified Rock Guide and owner of Bear House Mountain Guiding.  Derek wrote much of the content of this article.

Also, members of the AAC Education Task Force were enormously helpful with feedback and commentary on this article.  Special thanks to Mark Vermeal, Jon Tierney, Dale Remsberg, Dougald MacDonald, Aram Attarian.  AAC Staff were also a great help.  Thanks Phil and Whitney in particular.

Belaying

The following article is reproduced from the 2016 edition of Accidents in North American Climbing. Author: Ron Funderburke.

Climbers have been belaying for as long as they’ve been using ropes. We use some type of belay in almost every roped climbing context—it is the essential skill that unites all disciplines. It’s interesting, therefore, to see how little agreement there is about the “best” belay techniques, how distracting our assertions about belaying tend to be, and how rigidly dogmatic we can be about a task that many understand so imperfectly.

This dogmatic approach persists even though using a rope to belay something valuable—whether a load of cargo on a ship or a climber on a cliff—has always been organized by three fundamental principles:

  • There should be a brake hand on the rope at all times.

  • Any time the brake hand slides along the rope, the rope should be in the brake position.

  • The hands and limbs should be positioned according to their natural strength.

These are the principles that we should use to evaluate belaying, yet our discussion of “good” or “bad” belaying often revolves around a specific biomechanical sequence. It’s time to abandon this way of talking and thinking about belaying. It’s misleading, reductive, and provokes more arguments that it solves.

Meanwhile, a cursory perusal of any edition of Accidents reveals there are severe consequences for imprecise understanding of belaying. In recent years, 5 to 10 percent of all incidents reported have involved inadequate belays.

This edition of Know the Ropes will equip readers with language and principles that unify all belay contexts. Additionally, for those who are new to belaying, those who want to learn to belay in different contexts, or those who aren’t sure about their current technique, this article will provide some suggestions for how to do so in a fundamentally sound way.

THE ORIGINS OF BELAYING PRINCIPLES

The earliest belayers used the most primitive technique: The belayer held the rope tightly and did not let go under any circumstance. Belayers had to be very strong, and the rope had to be kept very tight. And the brake hand had to be on the rope at all times. Even the strongest belayers and the lightest climbers wouldn’t stand a chance without this fundamental principle. 

The addition of friction to the belay system allowed smaller belayers to secure bigger climbers. Wrapping the rope around features in mountain terrain or the belayer’s body provided enough friction to hold larger loads. 

Friction also introduced two new realities to belaying. First, friction could be increased and decreased, creating a “belay cycle.” Increased friction is valuable when holding a load; decreased friction is valuable when trying to move rope through the system.

The second new reality was that friction allowed the belayer to relax a little. In the more primitive form of belaying, without friction, the belayer’s hand-over-hand technique maintained a constant grip on the rope. By contrast, a belay system with friction allows the belayer to relax [their] grip at some points in the cycle, which, naturally, deprioritizes vigilance.

These changes led to the second fundamental principle of belaying: Since every belay cycle has a point of high friction, it makes sense to spend as much time in that position as possible. Therefore, whenever the brake hand slides along the rope, the rope should be in the brake position. If a climber falls while the brake hand is sliding on the rope, it obviously will be easier and quicker to arrest the fall if the rope is already in the brake position.

Since the addition of friction to the system, every major evolution in belaying has involved some sort of technology. First came the carabiner, which not only allowed belayers to augment their friction belays but also invited the use of hitches, tied to carabiners, as belay tools. The most effective of these was the Munter hitch. 

belaying on a Munter hitch; traditional belaying

The Munter hitch offered a braking position that was the same as the pulling position, so the belay cycle was easy to teach and learn. It soon became the predominant belay technique in all disciplines. (Before the advent of reliable protection, dynamic belays, and nylon ropes, belaying was primarily the duty of the leader. A second might belay the leader, but the leader was not expected to fall, nor was it widely expected that a leader fall could be caught.) The Munter hitch, belaying a second from above, conforms naturally to the third fundamental principle of belaying: It positions the hands, limbs, and body according to their natural strength. It keeps the belay comfortable and strong throughout the belay cycle, and while taking rope in, catching falls, holding weight, and lowering.

THE MODERN ERA

An era ago, these fundamental principles were not really in dispute. They applied to body belays (hip belays, butt belays, shoulder belays, boot-axe belays, etc.), terrain belays (belays over horns, boulders, and ridgelines), and belays on carabiners (Munter hitch). However, by the Second World War, climbers began to use nylon ropes and other equipment that could handle the forces of leader falls. Moreover, climbing clubs, schools, and enthusiasts began to experiment with redirecting the climbing rope through a top anchor, so that belaying on the ground, for both the leader and follower, became much more common. Pushing the limits of difficulty also became more common— leading to more falling.

Belayers around the world also began to experiment with new belay tools that redirected the braking position 180 degrees—the most common early example was the Sticht plate, but the same principle applies to today’s tube-style devices. Instead of the brake strand of rope running in the same direction as the loaded strand (the climber’s strand), the belayer had to hold the brake strand in the opposite direction.

For many years, instructors and textbooks explained how to use these new manual belay devices (MBDs) by defaulting to the hand and body positions that had become entrenched from the use of the Munter hitch and the hip belay. The most common of these was the hand-up (supinated) brake-hand position on the rope. 

The stronger, more comfortable technique with MBDs is a hand-down (pronated) position with the brake hand, and newer texts and instructors often adopted this technique, in order to connect the new technology with the fundamental principles of belay. But the resulting cacophony—with belay instruction varying wildly—gave students and climbers the impression that belaying did not have any governing principles. 

We climbers have our sectarian instincts, and climbers today are as likely to argue the relative merits of various belay techniques as they are to argue about the merits of sport climbing and trad climbing, alpine style and expedition style. The goal of this article is to redirect all belayers’ attention to two indisputable truths: 

  • Belaying happens in many, many different contexts. 

  • Belaying in every context is most effective when it is based on the three fundamental principles, which long preceded any arguments we are currently having. 

THE CONTEXTS OF BELAYING

Even though we generally learn to belay in a fairly simple context (top-roping), belaying is much more diverse than what happens in an Intro to Climbing class. The most appropriate belay techniques can vary widely depending on the setting (gym, multi-pitch crag, alpine climb, etc.) and whether the climber is leading or following. Most generally, belaying happens in three different ways, using different techniques and tools for each: friction belays, counterweight belays, and direct belays. 

FRICTION BELAYS

In a friction belay, the rope runs directly between the belayer and climber, and there might not be any anchor. The potential holding power of the belay is relative to the amount of friction one can generate, the strength of the belayer’s grip, and the resilience of the object providing friction. 

Friction belays are most common in mountaineering (though there are other contexts where they provide efficient and prudent options). In the mountains, there usually are long stretches of terrain where a full anchor is not necessary and building and deconstructing anchors might dangerously delay the climbers. 

Most commonly, the belayer will select a feature of the terrain to belay or use [their] body to create friction. The belay stance must replace the security that an anchor might have provided, whether by bracing one’s feet, belaying over the top of a ridgeline, or another method. Any terrain features used to provide friction or a stance must be carefully inspected to ensure they are solid and won’t create a rockfall hazard. 

COUNTERWEIGHT BELAYS

Whether climbing single-pitch routes or belaying the leader on a multi-pitch climb, these are the most commonly used belay techniques. The climbing rope is redirected through a top anchor or a leader’s top piece of protection, and the belayer provides a counterweight, coupled with effective belay technique and tools, to hold or lower the climber or catch a fall. 

Even though there are plenty of exceptions, the vast majority of American climbing happens in a single-pitch setting, on a climb that is less than 30 meters tall. The belayers and climbers generally are comparably sized, and the belayer is comfortably situated on the ground. Belaying this way provides a more social atmosphere, allowing for banter, camaraderie, and coaching. That’s why climbing gyms, climbing programs, and most casual outings gravitate toward this belay context. 

However, the ease and comfort of single-pitch counterweight belays do not liberate the belayer from serious responsibilities. Thankfully, there are several different biomechanical sequences for belaying a top-rope that fall under the halo of the three fundamental principles. Each of the three techniques outlined below comes with a set of pros and cons that makes it the preferred methods of certain groups of climbers, instructors, and programs. 

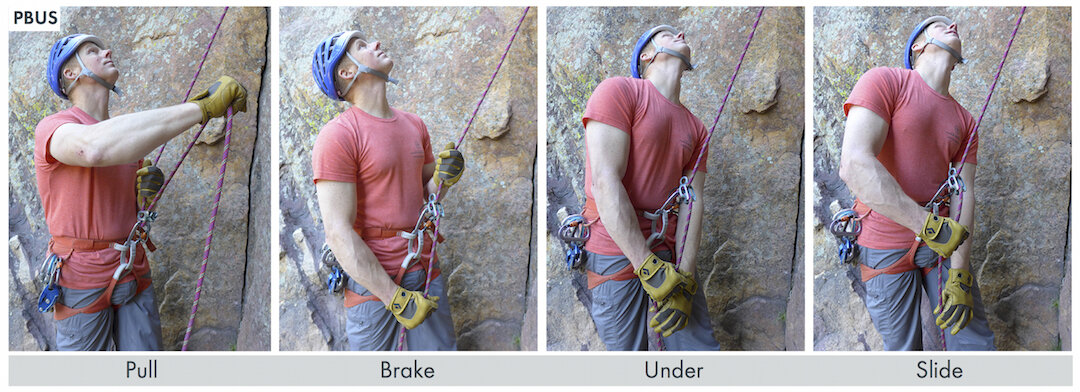
PBUS

The top-roping belay technique commonly known as PBUS resonates with climbing instructors and mentors because it emphasizes the fundamental principles so distinctly. The hand transition is securely in the braking position, and it’s hard to imagine the belayer losing control if the climber were to fall while the hand was sliding. Plus, the ergonomics of the technique keep the wrist and grip pronated.

PBUS is most effective when a top-roper is moving slowly and hanging frequently. When the climber moves quickly and proficiently, a strict adherence to this technique often causes the belay setup to collapse, which could allow the belay carabiner to cross-load. It’s also harder to move slack quickly enough to keep up with a proficient climber. 

belaying; PBUS method of belaying

HAND OVER HAND

If the belayer alternates brake hands, [they are] able to move slack through the belay cycle more quickly than with PBUS. As long as the brake hands are alternating in the braking position, this technique abides by the fundamental principles of belay, and it is a preferred technique for experienced belayers and for top-ropers who move quickly. 

Many instructors and mentors dislike this technique because it allows the belayer to keep “a” brake hand on at all times, instead of keeping “the” brake hand on at all times. As a result, this technique is usually relegated to more experienced teams.

belayer; Hand over hand belaying

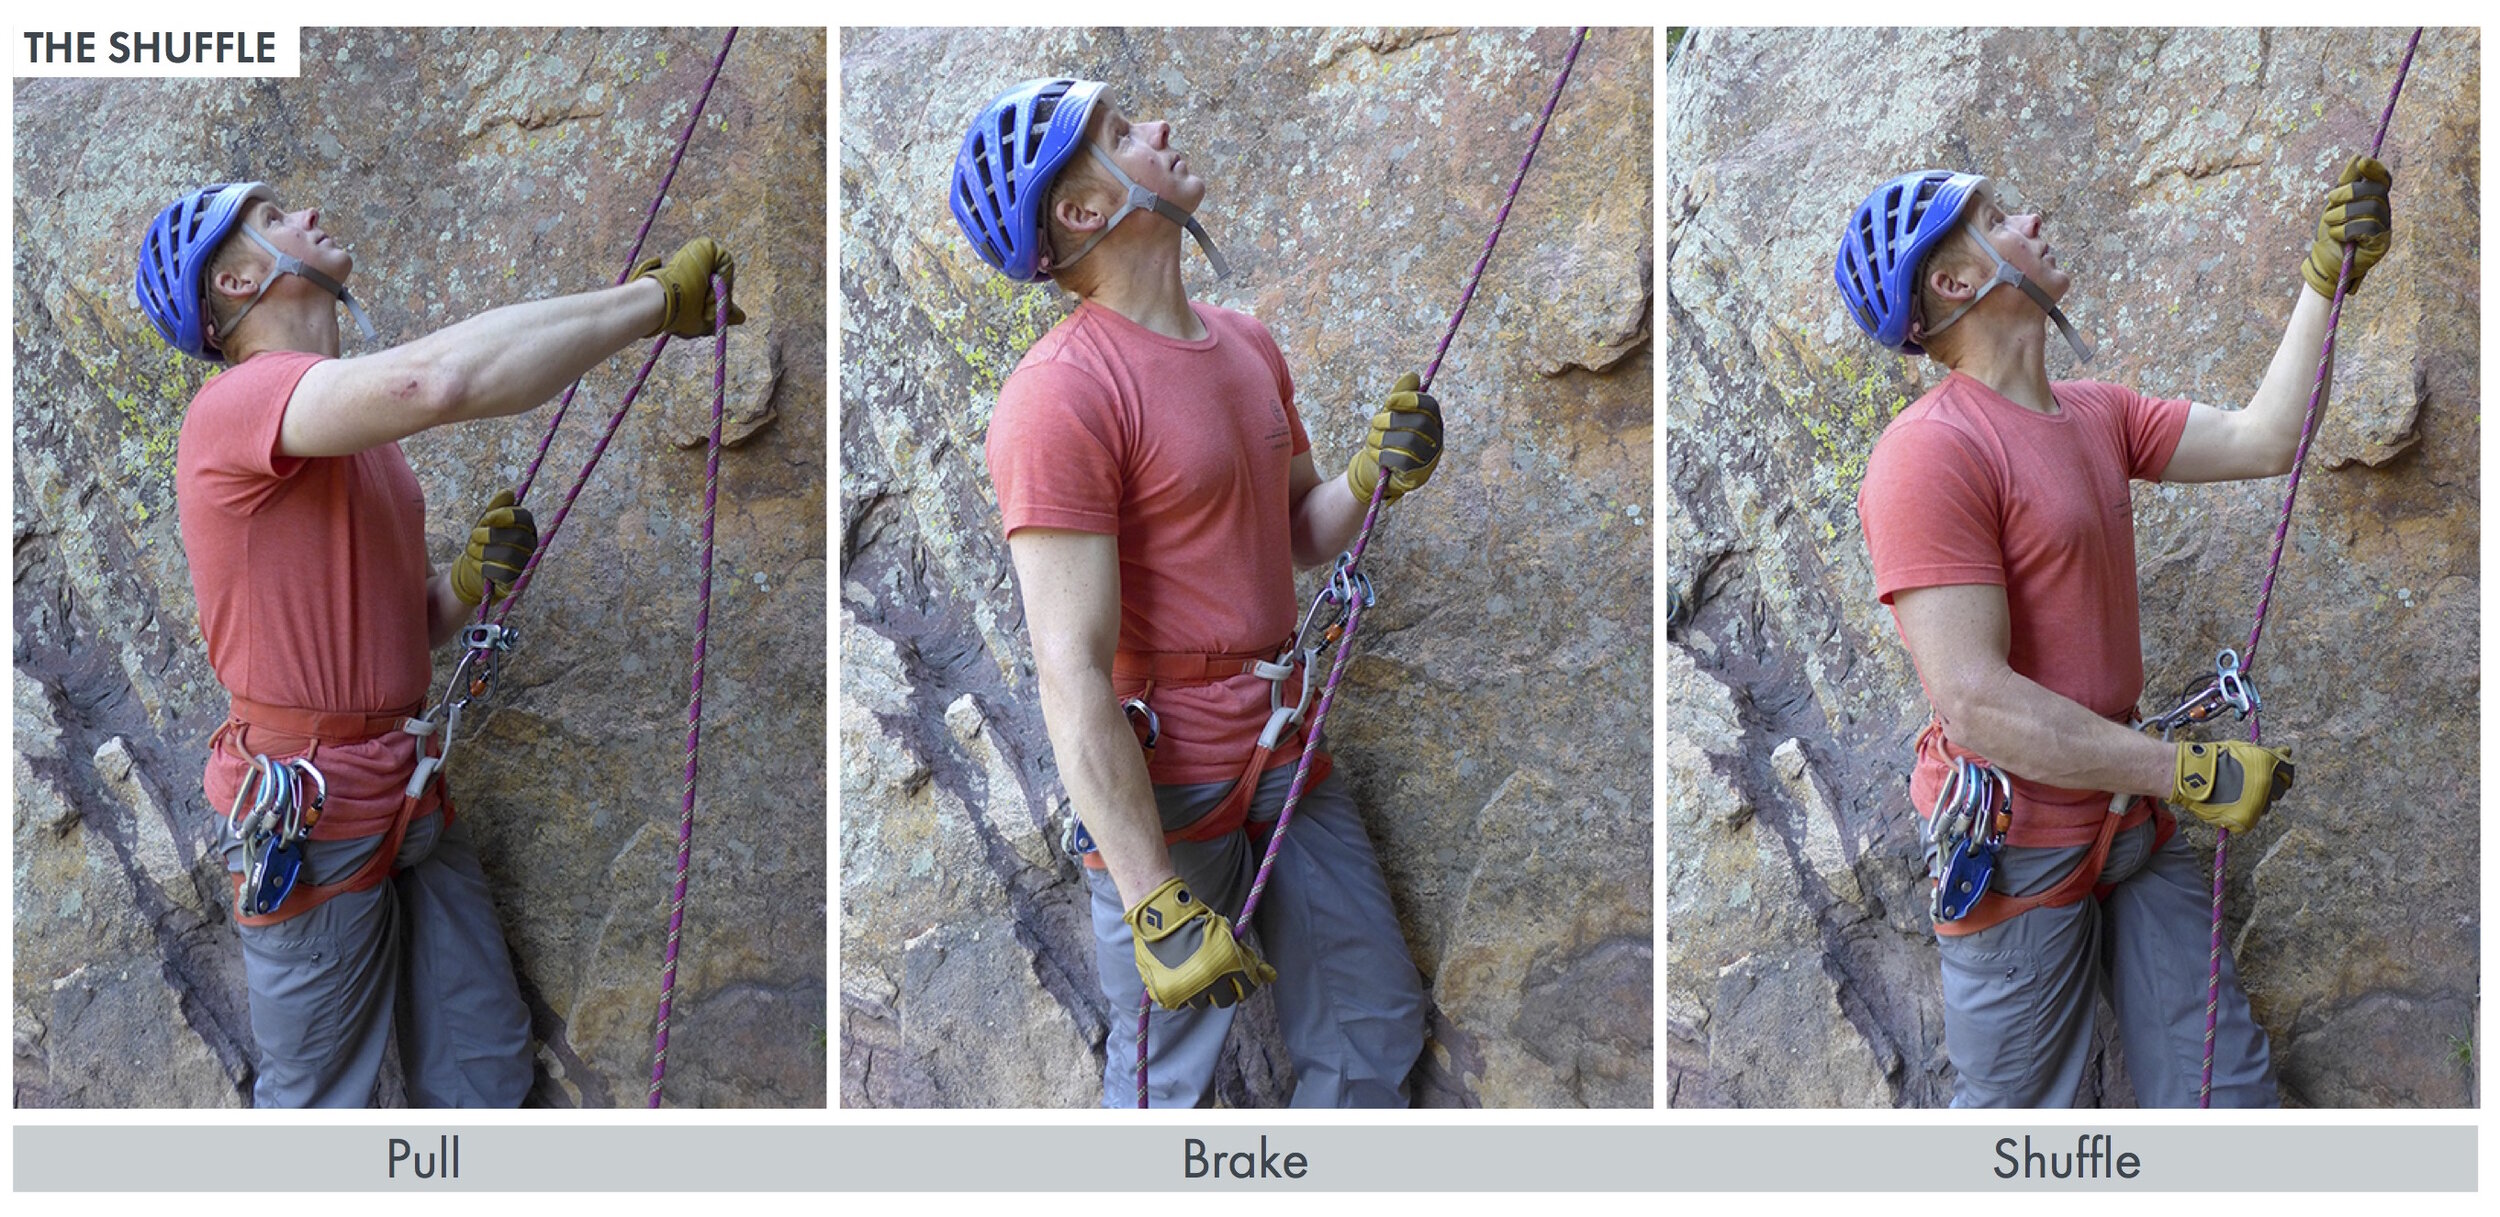
SHUFFLE

The shuffle technique is most applicable when using an assisted-braking device (ABD) to belay, but it can be used with manual devices by a very experienced belayer (read more about assisted-braking devices). It requires the belayer to have a refined sense of how to grip the rope with varying degrees of intensity, all without relinquishing the readiness to brake. A loosely gripped brake hand can shuffle along the brake strand, up or down, without letting go. A tightly gripped brake hand can be used to catch falls.

Many belayers find this technique unsettling because they are attached to the idea that a relentlessly strong grip on the brake strand is symbolic of the belayer’s commitment. With a proficient belayer, however, the shuffle technique is not only fundamentally sound, it also can be a smooth and reliable way to belay, especially with an ABD. 

anam-13201214178-1495804271.jpg

TOP-ROPE BELAYING IN ACTION

BELAYING A LEADER

Lead belaying involves the same fundamental counterweight arrangements as top-rope belays, but the dynamics involved in a lead fall greatly augment the forces a belayer must contend with. The loads can be severe and startling. Moreover, there is much more to effective lead belaying than simply paying out slack and catching occasional falls. The interplay of slack and tension requires quick and seamless adaptation, practiced and undistracted fine motor skills, and a situational awareness that is hard to achieve if one has never done any leading oneself. Lead belayers must master the following skills:

  • Setup and preparation

  • Correct use of the chosen belay device

  • Compensating for unnecessary slack

  • Catching falls

Unfortunately, lead belayers may only learn a portion of these skills before they are asked to perform all of them on a belay. It’s easy to imagine how a rudimentary skill set can result in frustration, accidents, or even fatalities. 

SETUP AND PREPARATION

A lead belayer needs to determine the likely fall line for a climber who has clipped the first piece of protection. Standing directly beneath the first piece and then taking one step out of the fall line (roughly 10 degrees) will usually keep a falling leader from landing directly on the belayer’s head, while still keeping the belayer in position to give an effective belay. 

Once the lead belayer decides where [they want] to stand, the rope should be stacked neatly on the brake-hand side, right next to the belayer’s stance. A knot in the belayer’s end of the rope (or tying in) closes the system. 

USING THE BELAY DEVICE

Lead belayers will have to learn some fine motor skills to offer an effective lead belay, especially with an ABD. It takes practice. 

Most of the time, the leader keeps [their] brake hand wrapped entirely around the rope, as with any other belay. The lead belayer pays out arm lengths of slack as the leader moves, and then slides the brake hand down the rope with the rope in the brake position. The mechanics are mostly identical, whether the belayer is using an MBD (such as an ATC or other tube-style device) or an ABD. 

But when the leader moves quickly or pulls a lot of slack to clip protection, the belayer will have to feed slack fast, without releasing the brake hand. This is easily learned with an MBD, using a form of the shuffle technique. But with ABD devices such as the Grigri, a specific technique for each device must be learned and practiced. Follow the manufacturer’s instructions and warnings. (Most have produced instructional online videos explaining the appropriate technique.) No matter which device you use, keep the fundamental principles of belaying in mind. Most importantly, your brake hand must stay on the rope as you feed slack. 

COMPENSATING

Lead belaying also involves a subtle exchange of giving and taking rope called compensating. When a leader makes a long clip, there is a moment where the rope is actually clipped above the leader’s head, and [they are] effectively on a short top-rope. As a result the belayer needs to make a seamless transition between giving slack, taking in slack, and giving slack again. The most extreme version of compensating happens when the leader downclimbs from a clip to a rest and then reascends to the high point.

CATCHING FALLS

The most important part of catching a fall is stopping a leader from hitting the ground or a ledge—or abruptly slamming into the wall. On overhanging climbs, a leader is less likely to impact objects, so longer falls are acceptable. But on vertical or low-angled climbs, the same length of fall could easily cause the leader to impact features along the fall line. 

The lead belayer must be constantly prepared to mitigate the fall consequence as much as [they] can, and a key part of this is maintaining the appropriate amount of slack and movement in the system. While belaying a leader on an overhang, the belayer might feel free to let the momentum of the counterweight lift [them] off the ground. This is the coveted “soft catch” that so many leaders seem to think is essential. 

But when a fall is more consequential—when it might result in ledge impact or a ground fall—an astute belayer may “fight” the fall, sometimes even taking in slack and bracing to increase the counterweight effect. 

It takes time and effort to learn this distinction, because every climb is a little different. One of the most important ways to learn lead belaying is to lead climb. An experienced leader will better understand the issues facing other lead climbers and will know what it feels like to have a belayer do [their] job perfectly.

LEAD BELAYING IN ACTION

DIRECT BELAYS

Direct belays connect the belay system directly to an anchor. As a result, the anchor must be fundamentally sound. That is to say, it has redundant construction, distributes loads intelligently to all the components, limits potential shock-loading if a single component were to fail, and is adequately strong. The anchor must easily sustain all the potential loads applied to it, plus a healthy margin of error. Its integrity should not be in question. Read more about anchors here or here.

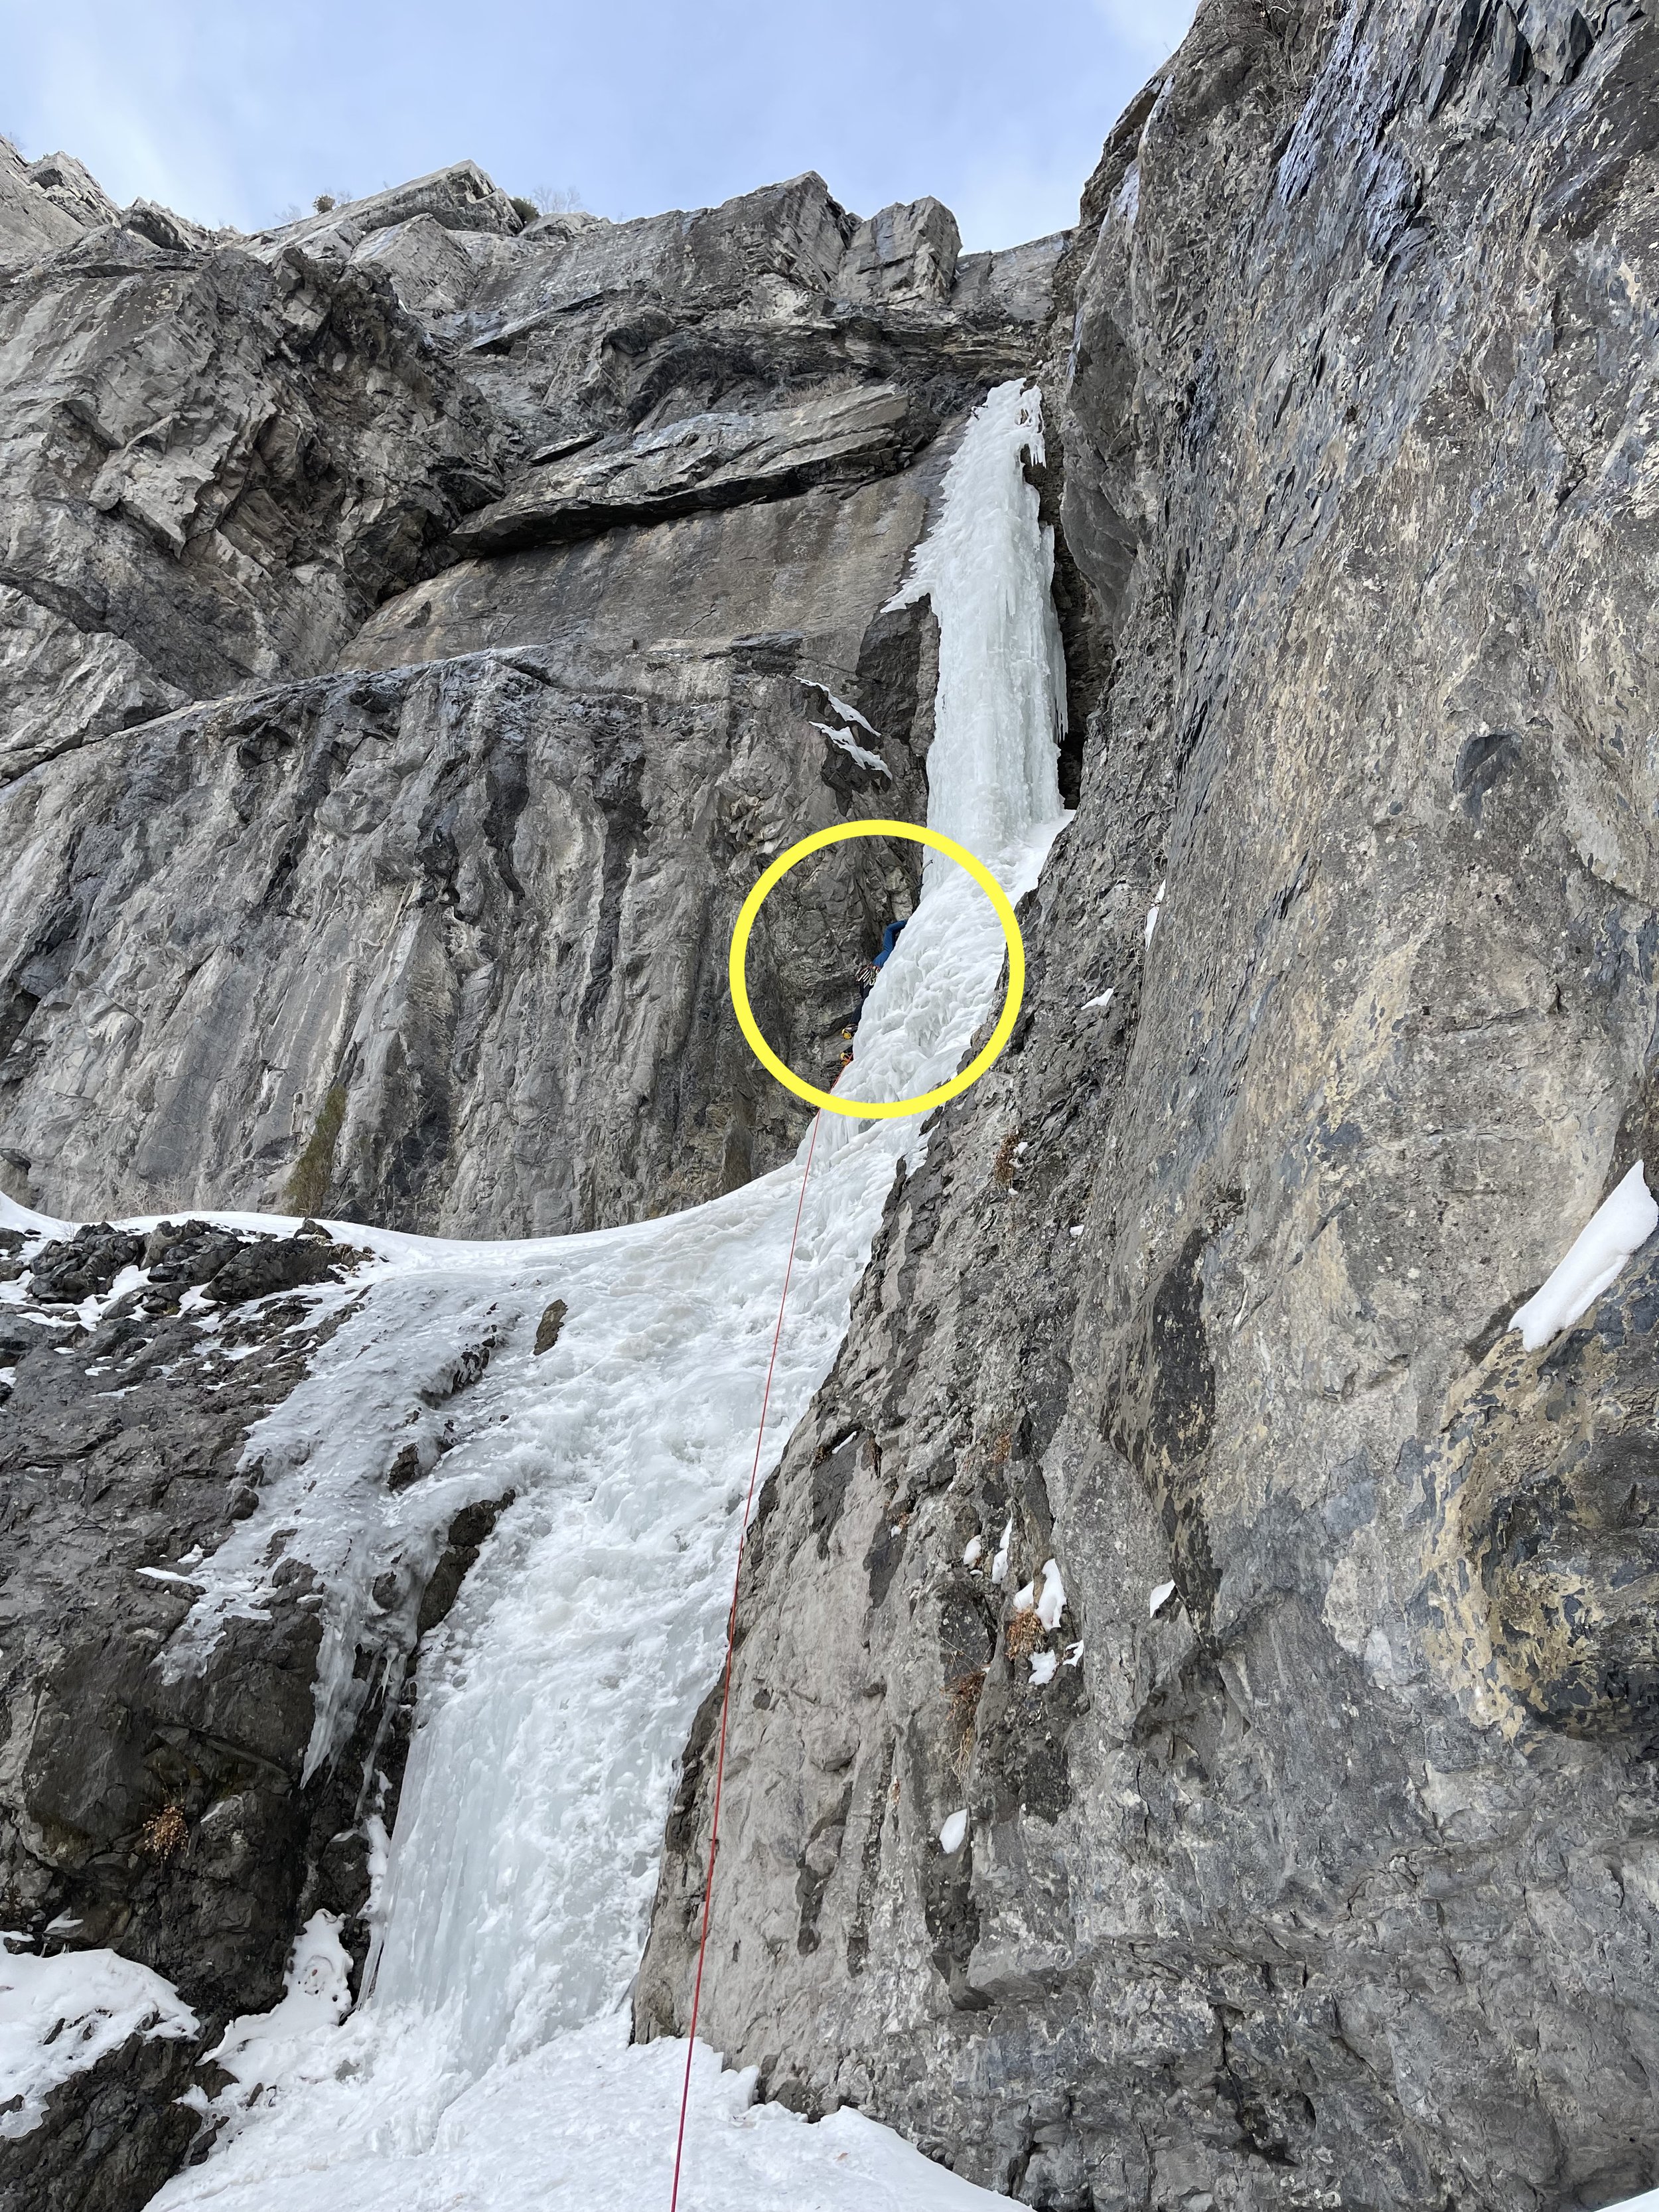
Direct belays are the most prudent way to belay a second from the top of a rock or ice pitch where falls are likely and consequential. (That would include all fifth-class rock terrain and almost every ice climb at any grade.) They do not trap the belayer in a counterweight arrangement, allowing the belayer to manage the rope and multi-task. Because the belayer is attached to the anchor separately, the belayer can affect assistance techniques to help a climber move up if needed. Direct belays also put less force on an anchor than counterweight belays do (which shouldn’t matter, really, because the anchor should be bombproof). Lastly, they are particularly advantageous when belaying more than one person simultaneously. 

Whether the belayer is using a Munter hitch, an MBD, or an ABD in a direct belay, the fundamentals apply: The brake hand is always on the rope, hand transitions occur in the braking position, and the limbs are positioned in ways that are comfortable and sustainable. Direct belays should confer all of the climber’s weight to the anchor, so it is easy to imagine a few different hand positions that take advantage of the belayer’s natural strength.Lowering is a completely different story with direct belays. As articles in Accidents will attest, lowering will usually require the belayer to disable or reduce a device’s autoblocking or braking function. As a result, the belayer should redirect the rope through the anchor and use a friction hitch or backup belay whenever [they are] lowering from a direct belay. 

COMMON MISTAKES

FINAL THOUGHTS

As we can see, there are so many variables to belaying that it can be counterproductive to say there is only one “right” technique. The appropriate belay method for each pitch depends on the terrain, the style and difficulty of climbing, the relative experience and weight of the climber and belayer, and the tools available. The “right” technique is the one that’s appropriate for each context, as long as it adheres to the fundamental principles of keeping your brake hand on the rope, sliding your hand only when the rope is in the braking position, and positioning your hands and body according to their natural strength.

Keep exploring belaying by watching our Know the Ropes videos here or checking out this slideshow. If you teach belaying or just want to take a deep dive, see the AAC’s own Gold Standard curriculum.

Find more information on a variety of topics, including “Climber Communication,” by checking out our complete Know the Ropes collection.

Rewind the Climb: Pete Schoening’s Miracle Belay on K2

by Grey Satterfield

artwork by James Adams

photos from the Dee Molenaar Collection

It happens every day, in every climbing gym across the country: the belay check. It can swell up a wave of anxiety for new climbers or a wave of frustration for more experienced ones, but no matter where you are in your climbing journey, you’ve done it. Everyone has demonstrated their ability to stop a falling climber. But what about stopping two climbers? What about stopping five? And what about stopping five without the convenience of a Gri-Gri, in a raging storm at 8,000 meters, hanging off the side of the second highest mountain in the world?

Pete Schoening checks all those boxes, and his miracle belay during an early attempt of K2 is one of the most famous in all of climbing history. It’s an awesome reminder that in climbing, much like in life, a lot of things change, but a lot of things don’t.

In 1953, during the third American expedition to K2, eight climbers funded by the American Alpine Club built their high camp at nearly 7,700m. The team consisted of Pete Schoening, Charles Houston, Robert Bates, George Bell, Robert Craig, Art Gilkey, Dee Molenaar, and Tony Streather.

On the seventh day of the ascent, climbing without oxygen, Schoening and his partners were within reach of the summit. With the first ascent of the long-sought peak tantalizingly close, the weather turned, trapping the climbers for10 days at nearly 8,000m. The storm raged on, destroying tents and dwindling supplies. Then Gilkey developed thrombophlebitis—a life-threatening condition of blood clots brought on by high altitude. If these clots made it into his lungs, he’d die. The team had no choice but to descend. Without hesitation, they abandoned the summit attempt and put themselves to work getting Gilkey to safety. With an 80mph blizzard compounding their effort, the climbing team bundled their injured comrade in a sleeping bag and a tent and, belayed by Schoening, began to lower him down the perilous walls of rock and ice.

After an exhausting day of descending, they had made it only 300m but were in sight of Camp VII, which was perched on a ledge another 180m further across the icy slope. Craig was the first to reach the site and began building camp. Then the real disaster struck.

As Bell was working his way across the steep face, he slipped and began to rocket down the side of the mountain. Bell was tied to Streather, who was also pulled off his feet and down the slope. The rope between the two climbers then became entangled with those connecting the team of Bates, Houston, and Molenaar, pulling them off in turn. The five climbers, along with the tethered Gilkey, began careening down the near vertical face, rag-dolling down the mountain over 100m and speeding towards the edge: a 2,000m fall to the glacier below.

At the last second—as the weight of six climbers slammed into him— Schoening thrust his ice axe into the snow behind a boulder and, with a hip belay, brought the climbers to a stop. The nylon rope (a relatively new piece of climbing gear at the time) went taught and shrank to half its diameter, but it did not snap. The hickory axe held the strain. Schoening, rope wrapped tightly around his shoulders, had performed what is considered one of the greatest saves in mountaineering history—known now and forever known as “The Belay.”

“When you get into something like mountain climbing,” Schoening said afterwards, “I’m sure you do things automatically. It’s a mechanical func- tion. You do it when necessary without giving it a thought of how or why.”

However, the incident was not without tragedy. As the team recovered from the fall and established a forced bivy, they discovered that Gilkey, bundled in sleeping bag and tent, had vanished. There is speculation that he cut himself free in order to save the lives of his friends above.

Schoening, always humble about the feat, was later awarded the David A. Sowles Memorial Award for his heroics by the American Alpine Club in 1981 as a “mountaineer who has distinguished himself, with unselfish devotion at personal risk or sacrifice of a major objective, in going to the assistance of fellow climbers imperiled in the mountains.”

Fifty-three years later, in 2006, 28 descendants of the surviving team gathered, calling themselves “The Children of ‘The Belay.’” All owed their lives to Schoening—and his ice axe—high on K2. The axe, which some have called the holy grail of mountaineering artifacts, is on permanent display at the American Mountaineering Museum in Golden, Colorado.

Much has changed in the world of climbing over the past 70 years. When Schoening headed up K2 in 1953, assisted-braking belay devices were yet to be invented. The AAC provided no rescue services as a benefit of membership. Nobody owned an InReach or a satellite phone. To survive in the mountains in that era was to rely solely on your team—on the trust that comes with tying in together and the knowledge that a friend is watching your back.

So we would do well to remember Pete Schoening and his belay—to hold the other end of the rope is a serious affair. The next time you go out climbing, don’t forget to give your belayer a high-five and a hug.


Grey Satterfield is the digital marketing manager for the AAC. He has a decade of experience managing climbing gyms and loves to share his passion for climbing with anyone who will listen, be it through writing, photography, or swapping stories around the campfire.

AAC's Gold Standard Curriculum: Belaying

Photo: AAC member Drew Smith

Photo: AAC member Drew Smith

Introduction

American climbers currently learn to belay from professional climbing instructors and guides, from formal and informal mentors, and an increasing number learn to climb in indoor/artificial climbing structures and facilities. While there is general competence with belay related skills and techniques, an underlying belay-related accident/incident rate underscores the lack of uniformity among American belayers. While certain belay techniques, tools, and principles seem to predominate, a national adherence/advocacy for a single set of guiding fundamentals, best practices, and standards does not exist.

The following curriculum is designed to not only define the content used to teach belay education programs for the American Alpine Club, but eventually consolidate and reform American belaying entirely.

Overview

  • Belaying Equipment

  • Attaching to the Climbing Rope

  • Fundamental Principles of Belay

  • The Belay System

  • Belaying a Top Rope

  • Belaying a Lead Climber

  • Use of Ground Anchors

  • Appendix 1: Third-Party Reviewers, Testers, Endorsements, and Certifications

  • Appendix 2: Additional Equipment and Ropework

Belaying Equipment

All of the equipment used to implement this curriculum should be designed, tested, and manufactured for climbing-specific applications by a reputable manufacturer. Any one of a handful of options are available in the United States, and unfamiliar or foreign manufacturers can be cross-referenced with several third-party organizations that confirm and endorse the strength, durability, and integrity of all the equipment mentioned in this curriculum (see appendix 1).

Harnesses

The Edelrid Solaris is a modern, all-arounder.

The Edelrid Solaris is a modern, all-arounder.

All harnesses used for rock climbing should be tested and designed specifically for that purpose. A modern climbing harness should consist of the following components, at a minimum:

  • Waist belt

  • Tie-in points *

  • Belay loop *

  • Buckles

The Black Diamond Vario Speed has a single belay and tie-in point.

The Black Diamond Vario Speed has a single belay and tie-in point.

*Some harnesses have the same point for tying in and belaying.

There are a few consequential variations in harness design: Harnesses with a single belay and tie-in point are oriented horizontally on the waist belt. As a result, the attachment of a belay device will have a left or right orientation that should be consistent with the belayer’s dominant hand.

Harnesses with two hard points are usually connected by a vertically oriented belay loop. As a result, the tie-in occupies a separate reinforced path than any carabiner that may be clipped to the belay loop. The vertical belay loop also results in a belay device orientation that is centered on the belayer’s body, negating the relevance of their specifically dominant hand.

Belay Devices

Unlike the terrain or body belay techniques used historically in rock climbing, a modern belay device introduces a more consistent and functional supply of friction to a belay system. When combined with an adequate counter-weight or a load-bearing anchor, a belay device can retard or halt the movement of a climbing rope, thereby arresting falls, creating comfortable lowers, and otherwise securing a climber in a climbing environment.

It is important to note that no belay device effectively secures a climber without a correct setup, effective and correct use, and/or an adequate counterweight or anchor.

While many different models, colors, and styles exist, they all fall into two major categories:

  • Plate/Aperture/Tube Devices

  • Assisted Braking Devices (Learn more about Assisted Braking Devices here.)

Locking Carabiners

Since the connection of a belay device to a counterweight or anchor is vitally important, ensuring the safety of a climber, a secure and reliable connection is a prudent practice.

An Edelrid HMS Bulletproof screwgate carabiner.

An Edelrid HMS Bulletproof screwgate carabiner.

Historically, a single carabiner with a carefully monitored locking mechanism has proved adequate. However, since the locking carabiner is a vital critical link in the climbing system, the security of its locking mechanism must be supplemented with a thorough understanding of the strengths and weakness of the unit, vigilant supervision during use, and careful inspection that precedes any belay sequence.

Parts of a Locking Carabiner

Basket/Basin. The larger side of the carabiner can accommodate bulky ropes, hitches, or tools.

An Edelrid HMS Bulletproof Twist FG carabiner with triple-action gate and belay loop keeper.

An Edelrid HMS Bulletproof Twist FG carabiner with triple-action gate and belay loop keeper.

Locking Mechanism. The locking mechanism keeps the carabiner’s gate from opening unintentionally. The different styles can be characterized by the number of physical movements it takes to open a locked carabiner. Screwgate closures require two physical movements, unscrewing the locking mechanism and then opening the gate; it is a two step locking mechanism. Other styles often require three steps.

Long and short axis. The long axis is designed to be loaded. The short axis is not. Locking carabiners are designed to load the long axis. Horizontal loads (loading the carabiner along its short axis) or tri-axial loads (loading the carabiner in three directions) can decrease the strength of the carabiner significantly and may compromise the overall climbing safety system.

Climbing Ropes

Climbing ropes are the most iconic tools in rock climbing. They are manufactured in dozens of varieties, but the ropes most important to this curriculum should be those specifically designed and tested for single strand rock climbing applications. The most relevant variations in climbing ropes are length, diameter, elongation, and middle indications.

Length. Most of the climbing and belaying done indoors involves a rope that is redirected from the top anchor so that both ends of the rope will reach the ground. In such an arrangement, the climbing rope should be twice as long as the climb. Indoors, these lengths are usually specifically cut to accommodate the length of the climbs in the facility. Outdoors, climbers usually purchase pre-cut lengths, typically sold in 60m and 70m options.

Diameter. The rope’s diameter has logical consequences for different climbing applications. Wide ropes are more durable but heavier, so they tend to be more popular indoors, where ropes do not need to be carried by climbers. Outdoors, climbers have a greater appetite for skinnier ropes, because they are lighter. However, as the rope diameter decreases, so does the overall durability.

A Sterling Helix 9.5mm dynamic climbing rope with bi-color patter to indicate the middle.

A Sterling Helix 9.5mm dynamic climbing rope with bi-color patter to indicate the middle.

Elongation. Climbing ropes stretch to absorb the energy of a falling climber and reduce the impact force sustained by the climber’s body, the belayer’s body, and the anchor/top piece. But, the amount of stretch can vary. Stretchy ropes are beneficial when lead climbers are taking falls, but less elongation is valuable for toproping, when climber’s prefer not to lose too much progress on the climb each time they fall.

Middle Indication. In many climbing applications, it is important to be able to quickly find the middle of the rope. The middle can either be indicated by a marking, inked or dyed onto the rope, or the sheath of rope may change pattern or color at the mid-point.

Attaching to the climbing rope

Attaching the climbing rope to a climber’s harness is a routine task in any climbing context. Indoors, it is common for the climber to tie in to one end of the rope, while the other end of the rope is simply managed. Outdoors, it is common for the climber to tie in to one end of the rope, while the belayer ties in to the other end of the same rope.

In both cases, the figure 8 follow through is one of several different options for attaching the rope to the climber, but it is the option that tends to dominate because it easy to teach, easy to learn, easily recognizable when tied correctly, while also being a secure and strong knot. This curriculum will emphasize tying the figure 8 follow through in a standardized manner, and it will propose the knot as the definitive attachment technique for American climbing.

Tying the Figure 8 Follow Through

When tying the figure 8 follow through, it is important to remember what sets the knot apart from all other options. It has a natural symmetry, and therefore an opportunity to create uniformity in the climbing system. Certain gestures create uniformity, so that the knot looks the same every time it is used:

  • The symmetry of the knot is based on having all strands parallel to each other.

  • The gap between the knot and the waist belt is the same size as the belay loop.

  • The knot has a 6 inch tail. No longer no shorter.

Step 1: Tie the Figure 8

Tie the figure 8 knot first; the knot is tied by wrapping a tail of rope around a loop and then passing the tail into the loop.

Each time, try to perfect the amount of tail. Different rope diameters will require slightly different amounts of tail to complete the next steps, but 12-18 inches is usually adequate.

Step 2: Pass the tail of the rope through the harness

Pass the tail of the rope through both tie in points. Try to avoid passing the tail through the belay loop in the process. Pull the knot next to harness to begin the next step.

Step 3: Complete the follow through by retracing the original Figure 8 with the tail

Use the original Figure 8 as a road map and retrace each turn of the knot with the tail. It will be helpful to start on the outside of the knot. Each time the knot is tied, make an effort to keep all the strands parallel. There will be fewer steps to complete if the knot is simply well-dressed in the first place.

Step 4: Make any gestures needed to standardize the knot

The figure eight follow through should be tied with all strands parallel to each other. It should have a 6” tail, and the gap between the knot and the waist belt should be the same size as the belay loop.

The figure 8 follow through. Find a visual step-by-step from Climbing Magazine by clicking the image.

The figure 8 follow through. Find a visual step-by-step from Climbing Magazine by clicking the image.

Fundamental Principles of Belay

Belaying has a long history. Innovated primarily in nautical applications, the earliest known belay techniques logically transferred to mountaineering, where climbers needed to a tool to secure each other during mountain travel. The fundamental principles that optimized the effectiveness of those early belay techniques have not changed. In fact, it is hard to imagine modern belaying without the standards and principles that preceded it.

The earliest belayers learned that in addition to the fundamental principles of belay they also needed to be attentive, vigilant, and take their responsibility to secure the climber very seriously. Today, that same attentiveness, vigilance, and seriousness should also characterize modern belaying.

anam-13201214178-1495803924.jpg

Principle #1: A brake hand must be maintained at all times.

The earliest belayers quickly learned that relinquishing a firm grip on the brake strand of a belay system creates an opportunity for catastrophe. If the climber falls in the instance that brake strand is not being maintained, the accelerating fall and rapid movement of the rope is almost impossible to arrest. Accordingly, one hand must be holding the brake strand of the rope at all times.

Principle #2: Hand transitions should happen in the position of maximum friction.

Modern belay tools, and the body and terrain techniques that preceded them, use friction to enhance the grip strength of the belayer. The friction of a belay tool dissipates the amount of mass the belayer needs to hold, and then the belayer’s bodyweight or the anchor is used to arrest the climber’s fall. As a result, there are points in the belay cycle where there is a maximum amount of friction and a minimum of friction. In the sequence of belaying, a belayer will need to continually move slack through the belay system, so there is a continual sequence in the which the rope is moved the system, and then the brake hands adjust their position on the rope in order to move slack again. The time when the hands transition is one of the most vulnerable moments in the belay cycle, and during that time the rope should rest in a position of maximum friction while the hands reset.

Principle #3: The hands and limbs should be positioned ergonomically.

Pulling on the rope, pulling slack through a belay system, resting in the brake position, and sustaining a fall, all require belayer to use their bodies and joints in a repetitive and sometimes strenuous way. It is important that hands and limbs take advantage of the natural ergonomics of the belay system so that stamina, reactivity, and grip strength are optimized.

Tertiary Principles Specific to Rock Climbing

Back up belay(er)s are a valuable addition to any belay system. Another set of hands, another set of eyes, and a measure of redundancy are great ways to enhance the security of a belay. But, another person has not historically been a part of belaying. When available though, and especially when belayers are still learning, it can be a valuable principle to adopt.

Belayer’s grip strength and the amount of friction applied by a belay tool can be instantly negated if the belayer’s body mass does not provide an adequate counterweight to a climber. When a climber weighs more than 40% of a belayer’s body weight, it will start to be difficult for the belayer to avoid displacement. In these scenarios, adequate use of a ground anchor (for ballast) or friction on the rope system (through twists, wrapping an anchor bar, an adequate number of directionals, or the inherent friction of the rope running over the terrain) will be needed.

Climbers will need belayers to continually move slack out of the belay system, but they will also need belayers to pull all the stretch out of the rope at times, when the climber wants to rest on a tight rope for example. Due to this circumstance, belayers must become adept at not only belaying slack but belaying stretch as well. Belaying requires enough strength to pull latent elasticity out of the belay system so that the climber can rest without elongating the rope an inordinate amount.

Read more about the fundamentals of belaying and different belay techniques here.

The Belay System

When a climber understands the fundamental principles of belay, the belay system can be mastered. The belay system has four essential phases: The setup, communication and double checks, belaying and lowering, and termination.

The Setup

To setup a belay system, the climber and belayer will need to manage both ends of the rope; either by tying in with a figure 8 follow through or knotting the end of the rope. The belayer will need to select an appropriate belay tool, set it up correctly on the rope, and determine the need for a ground anchor. If an anchor is needed, that must also be set up.

Communication and Double Checks

A climber and a belayer are co-dependent. They must work as a team. So precise communication and double checks are an imperative part of their teamwork. The following communications should be learned and recited on every climb/belay:

On Belay, [Name of Belayer]?” The belayer begins a vigilant, attentive, and serious administration of the belay system.

The climber displays their tie-in, harness, helmet, and climbing rope, while inspecting the belayer’s harness, belay setup, helmet, and ground anchor. The belayer checks the climber. When all these double checks are affirmed, the belayer can confidently continue to communicate.

Belay on, [Name of Climber].”

Climbing, [Name of Belayer].”

Climb On, [Name of Climber].” The climber begins climbing.

Got You, [Name of climber].” The belayer pulls all latent elasticity so that the climber can lean back and put weight on the rope.

Ready to Lower, [Name of Belayer].” When the rope is tight, the climber leans back and relinquishes all body weight to the rope.

Lowering, [Name of Climber].” When the climber is ready to lower, the belayer lowers the climber gently and smoothly to the ground.

Off Belay, [Name of Belayer].”

Belay Off, [Name of Climber].” If the climber is safe, firmly footed, and secure, there is no longer a need for belay, and the belay system can be deconstructed.

Conditional Communication

Slack, [Name of Belayer].” The belayer provides one arm length of slack. If the climber requires more slack, they will request more.

Up rope, [Name of belayer].” If the climber needs the belayer to move slack out of the belay, the “up rope” communication is given. In this circumstance the climber should also stop climbing until the slack is removed from the system.

Tension, [Name of belayer].” The belayer pulls all latent elasticity so that the climber can lean back and put weight on the rope. Most commonly, this is so that the climber can rest.

Rock!” If any object is falling, all those who observe the falling object call “Rock!”

To learn more about climber communication, check out this article.

When Double Checking

When the belayer and climber communicate, it is important to understand that the initial communication, “On Belay, [Name of Climber]?” is intentionally rendered in the form of a question. The climber is asking if the belay system is ready. Before the belayer can accurately and affirmatively reply, double checks are vital. The belayer must check the climber, and the setup of the belay system. The most vital items to double check are:

Buckles. Before leaving the ground, both the climber and belayer should demonstrate to each other that the buckles on their harnesses and helmets are secure (double-backed if appropriate) and tight.

Abdomen Fit (Harness Fit). A climber could fall out of a loose harness. Both the climber and belayer should inspect each other’s harnesses for proper fit. It is important that the harness is situated above the pelvis and that it is adequately tightened.

Rope. It is important to ensure that the rope is ready to use before the climber leaves the ground. Unwanted twists should be untwisted. When lots of ropes are set near each other, it is important to confirm that the climber and belayer are set up on the same rope. Both ends of the rope should be managed.

Belay Device. All belay devices have specific orientations that must be set up correctly. ABD’s should be loaded correctly, and plate/aperture/tube devices should be oriented so that the braking motion does not twist the belay loop.

Carabiner. The locking mechanism of a belay carabiner contributes to proper function and strength of the carabiner. If a belayer fails to lock the carabiner, it could create a dangerous situation when the climber loads the belay system. At the beginning of a climb, the belayer should demonstrate to the climber that the carabiner is locked by attempting to press the gate in.

Knot. The figure 8 follow through is used to directly connect the rope to a harness. If tied incorrectly, the result could be devastating. It is the climber and belayer’s responsibility to ensure that the climber has a properly tied knot which passes through both tie in points of the harness.

Belaying and Lowering

Once the belay system has been setup, the system has been double checked, and the climber and the belayer have communicated their roles clearly and unambiguously, the actual belaying, climbing, and eventually lowering is the next phase of the belay system.

A climber that is secured by a top rope from above will create slack, and the belay system should constantly remove slack. Additionally, when a climber wants to rest on the rope, when a fall is anticipated, or prior to lowering, belayers also need to remove any latent elasticity from the rope system.

A lead climber will need a steady supply of rope to clip the rope into incremental protection. While the fundamental principles of belay remain unchanged for this context, it is fundamentally different than top rope belaying in two ways. First, belaying a lead climber involves giving slack, not taking in slack. But, the belayer must be precise in the amount of slack given. The lead climber should have just enough slack to move and clip the rope, unencumbered. There should be no more or less slack given than the amount needed to accomplish this task. Second, a lead belayer sustains a higher impact force when a lead climber falls; they are often displaced by the dynamic forces of the lead climber’s fall. Such displacement cannot compromise the integrity of the belay. The fundamental principles must be adhered to, even when acting as a dynamic counterweight.

In most contexts, a climber will need to be eventually lowered from a climb. When lowering, the climber completely surrenders their body weight to the belay system, and the belayer is entirely responsible for delivering the climber safely to the ground. If the climber does not lean back entirely, the belayer cannot provide an effective lower.

Termination

Once the climber and the belayer are either safely anchored or safely situated on the ground, the final phase of the belay system is termination. It is important that the belayer remain vigilant, attentive, and serious until the belay system is terminated. When the climber is either safely anchored or firmly footed, the “Off Belay, [Name of Belayer]” command assures the belayer that the climber no longer requires the safety of the rope.

The belayer can respond, “Belay Off, [Name of Climber].” The only time a belay system should be terminated is when it is no longer needed. If a climber terminates a belay system, they should no longer require belaying, they should be safely situated on the ground, or they should be anchored.

Celebrating a successful climb. Photo: AAC Member Ron Funderburke.

Celebrating a successful climb. Photo: AAC Member Ron Funderburke.

Belaying a Top Rope

When the belayer is positioned at the bottom of a climb, an appropriate belay technique must adhere to the fundamental principles of belay. While there are a few acceptable techniques for doing so, a common and effective technique is popularly known as Pull-Brake-Under-Slide, or P.B.U.S.

P.B.U.S.

Pull-Brake-Under-Slide is the natural application of the fundamental principles of belay to a plate/aperture/tube device. In fact, when that tool was first innovated, it was the first time that belayers were forced to make a hand transition behind their belay tool. It was the first time that their hand positions changed from palm up to palm down.

PBUS has the added benefit of being easy to instruct, easy to belay latent elasticity, easy to accommodate an effective backup belay, easily transferable to other tools like an Assisted Braking Device.

As the acronym suggests, there are four steps. The belayer simultaneously pulls slack toward the belay device with the guide hand and through the device with the brake hand. If this movement is not coordinated, the rope will be difficult to move, or the plate/aperture/tube will pinch or grab, making the movement of the rope cumbersome.

Then, the belayer quickly moves the brake hand and brake strand to the brake position; the brake hand never relinquishes its grip from the rope. Next, the guide hand can pinch the rope under/behind the brake hand. The pinch provides enough resistance so that the brake had can slide forward again, never having relinquished its grip. These steps are constantly repeated as slack or elasticity are created by the climber’s progress. All four steps should constitute a terminal progression. In other words, a belayer should never pause in the middle of the sequence. If the climber is standing still, the belayer’s brake hand should be on the rope, in the braking plane, ready to initiate all four steps.

When lowering, both the guide hand and the brake hand should clasp the brake strand, so that lowering offers the climber the security of both hands. The fundamental principles of belay apply when lower too. So, a belayer’s transitioning hands should be in the braking plane while lowering.

Using an ABD

While PBUS is a perfectly applicable belay technique when using an ABD (e.g. Petzl GriGri or Edelrid MegaJul), it is important to remember that the braking mechanics of an ABD are fundamentally different. The braking cam or extra grabbing of an ABD will grip the rope tightly, with a deceptive amount of reliability, when all the latent elasticity is removed from the belay system. Belayers can easily be confused by the notion of brake position or braking plane, because the device will appear be doing all the braking, irrespective of the position of the brake strand or even the brake hand. But, this kind of confusion is a deception and misapprehension of the ABD. The fundamental principles of belay also apply to an ABD. Accordingly, the PBUS technique is still a good one. The advantage of an ABD is that when it is used correctly, it is easier to pull all the latent elasticity out of the belay system. The ABD’s braking mechanism will make it more difficult for increments of slack to slip back toward the climber, so a tight and reassuring belay can always be offered.

When lowering, however, the braking mechanism must be deactivated. Usually, the guide hand opens the braking mechanism while the brake hand makes all of its transitions with a firm grip, in the position of maximum friction.

Belaying a Lead Climber

Belaying a lead climber requires a different belay technique than belaying a toprope. Both the plate/aperture/tube style device and the ABD are serviceable options, but they both require special attention when belaying a leader. In both cases, the fundamental principles of belay are applicable.

Using a Plate/Aperture/Tube

When belaying a leader, PBUS will not be a helpful belay technique, because of the need to steadily give slack to a lead climber. For lead belaying, the belayer should slide the brake hand back, sequestering a quantity of slack to be given to the leader. Then, the brake hand pushes slack toward the device while the guide hand feeds that slack to the climber. As a result, the lead belay is effected in arm length (or shorter) increments. If the leader is climbing at a rate that exceeds this arm-length increment, the belayer will not be able to provide an adequate supply of slack AND adhere to the fundamental principles of belay.

When a leader falls, even the strongest belayer, with the strongest grip, will allow some rope to slip through the belay device. This slippage is unavoidable when using a plate/aperture/tube device. As a result, lead belayers learn to grab to the brake strand with both hands when the leader falls. Doing so immediately arrests any further slippage of the belay system.

Using an ABD

When belaying a leader with an ABD, the braking cam, which was such an asset in the toprope belay, now poses a unique challenge to a belayer who often needs to supply slack readily, quickly, and in large amounts. When a lead climber is moving slowly and smoothly, without long clips or the need for large amounts of slack, the exact same technique deployed for a Plate/Aperture/Tube device will work, especially if the rope is smaller and smoother. But, it is common that lead climbers move quickly in certain sections; they make dynamic and leaping moves; they clip overhead from good holds. So, a lead belayer must learn to apply the fundamental principles of belay with a multi-tasking brake hand.

Learning to provide an attentive and vigilant brake hand, while asking single fingers to also stabilize the ABD and deactivate the braking cam, is a complex motor skill. It takes practice and care. But, when done properly large amounts of slack can be offered quickly and nimbly, while the brake hand faithfully grips the brake strand.

The multi-tasking brake must be able to grip the rope firmly, which is easy for most. Firm grips are used to catch falls and most users know how to grip tightly. But, the brake hand must also be able to grip the rope lightly. When gripping lightly, the brake hand is loose enough to slide rope, but never so loose as to release its vital connection. With a loosely gripped brake hand, the forefinger cups under the ABD, holding the ABD in a rigid position, while the thumb squeezes the cam, restricting the cam’s range of motion. The guide hand then flings slack to the climber at an appropriate rate.

The multi-tasking brake hand should take every opportunity to return to default to a dedicated position on the brake strand when the climber is not moving. Or, if the climber resumes moving more smoothly, a traditional lead belay technique can be reinstated.

Ground Anchors

Ground anchors provide ballast when there is a large weight discrepancy between a climber and a belayer. They are also valuable tools for stabilizing a novice belayer. In both cases, the rapid or violent displacement of the belayer can jeopardize the belay system. At the very least, an unexpected displacement makes it difficult for the belayer to focus on the fundamental principles of belay. So, ground anchors are something that any belayer may need, on occasion.

There a three parts to ground anchoring: the anchor, the connections, and the connector. For all three parts, there are a number of variations, but the essential role of each part is the same. The anchor provides enough mass to ballast the belayer; so a clump of backpacks, another person, a free weight, a living tree, or an arrangement of bolted floor anchors might suffice. Connections are the materials that connect the belayer to the anchor. Sometimes slings are used, sometimes PAS or daisy chains, sometimes chain link, sometimes the climbing rope itself. Lastly the connector is the tool or knot that connects the belayer or the anchor to the connection. Carabiners, quicklinks, or a series of knots or hitches are all common connectors.

Three common ground anchor arrangements are:

Using another person wearing a climbing harness as an anchor. The climbing rope with a figure 8 follow through connects the rope to the belayer and a clove hitch with locking carabiner connects the rope to the anchor.

Using floor bolt as an anchor, a PAS as a connection, and locking carabiners to connect the PAS to the belayer and the anchor.

Using a sandbag as a ground anchor, a 48” sling as a connection, and locking carabiners as connectors.

In all three cases the connection should be rigged such that line between the belayer and the top anchor is straight, in-line, and tight. Otherwise displacement can still occur. The position of the ground anchor is least disruptive when it is positioned on the belayer’s brake hand side.

Appendix 1: Third Party Reviewers, Testers, Endorsements, and Certifications

Different organizations ensure consistency in the safety standards and manufacturing processes of all the equipment related to belaying. Any climber and belay team should look for the following endorsements and certifications to guarantee that equipment used in a belay system is appropriate for climbing applications.

CEN. The CEN is the European Committee for Standardization. A product must receive approval by this committee before it can be sold in the European Union (EU). Climbing equipment will have a CE stamp, which indicates that the product meets the minimum requirement of the EU Personal Protective Equipment Directive. The CEN works directly with the UIAA to determine the strength and manufacturing requirements for PPE.

UIAA_Logo_vertical_color.jpg

UIAA. The UIAA (International Climbing and Mountaineering Federation) existed before the CEN was created. Climbers and mountaineers themselves develop the UIAA standards. The UIAA collaborates with CEN to create a consistency of standards. In some cases the UIAA calls for more testing than the CEN, which can makes their standards slightly more strict.  Equipment that has been approved by the UIAA has been appropriately embossed.

3-Sigma. 3-Sigma is a statistical testing standard that is used by climbing equipment manufactures to ensure consistent quality. In order to arrive at a 3-sigma rating, the standard deviation is taken from strength testing results, multiplied by 3 and then subtracted from the average. This process ensures that 99.87 percent of the products put on the market will be above the actual product rating. You will not find a 3-sigma stamp on PPE although many PPE manufactures use this process to ensure safety and quality of their products.

ISO. ISO is a non-governmental, international organization that works with manufacturers to develop approaches to consistency in product manufacturing. The ISO 9000 series in part applies to climbing related activities. Rather than actually rating the product, ISO instead works to ensure a consistent manufacturing process. If a company is compliant with ISO it means that every single “x” style carabiner will be identical when they reach the market. You won’t find an ISO stamp on PPE although many climbing equipment manufactures comply with ISO to ensure consistency of their products.

Appendix 2: Additional Equipment and Ropework

Helmets

A high number of climbing related accidents and deaths are due to falling debris. It is extremely important to use climbing helmets to minimize this risk. Climbing helmets are specifically designed to protect the skull by absorbing the force of falling debris (such as rocks, ice, or dropped equipment). They were originally designed much like the hard hats that you see construction workers use. The climbing helmet has since evolved to become lighter, stronger, and more efficient. In indoor climbing, most of the risk of falling debris has been mitigated, even though objects are routinely dropped, holds break and fall, and climbers can easily impact each other is some circumstances. Nevertheless, the choice to not wear a helmet inside seems common and accident rates due to falling debris are low.

Outdoors, however, falling debris is more unpredictable and difficult to manage. The size of things that fall can also be catastrophically large. Accordingly, helmet use outside is strongly advised and recommended in this curriculum.

Extra Grabbing Plate/Aperture/Tube Devices

There are a number of plate/aperture/tube devices available that give very reliable lead belays even with an inconsistent application of the fundamental principles of belay.

Devices like the Mammut Alpine SMART or the Edelrid MegaJul can be wise additions to a lead belayer’s repertoire. However, a quick perusal of the manufacturers suggested use confirms that even these extra grabbing and reliable tools are still held to the same fundamental principles of belay that apply to all other belay methods. While devices of this kind may one day reform the fundamental principles of belay, Mammut and Edelrid currently make it quite clear they have not yet done so. See the manufacturer’s suggested use for specific instructions.

Clove Hitch

The clove hitch is an excellent hitch for attaching a climbing rope to a ground anchor.

Girth Hitch

The girth hitch is a common way to attach a sling or PAS to a belayer’s harness. While the girth hitch has severe penalties due to it effect on material strength, slings and PAS are strong enough to sustain the destructive effects of the girth hitch. Usually, however, the use of a locking carabiner can be substituted for a girth hitch, making the carabiner a less consequential option.